* Please note that there are 16 animated GIFs embedded in this post. If it’s slow to load and you see gaping holes in the post, be patient as the GIFs detail proper form on each variation
The single-leg hip thrust is a staple for lower body training, especially if you’re limited on equipment. I’ve written blogposts on single leg hip thrusts for almost 12 years now (see HERE and HERE). It’s one of the best bodyweight glute exercises there is, but before moving into the variations, I would like to go over optimal form.
With the bilateral (double leg) barbell hip thrust, both the scoop and hinge methods are acceptable styles of technique. Around 2/3 of people prefer the scoop method: keeping your gaze forward, moving mostly from the sternum down, and posteriorly tilting the pelvis at the top. Whereas around 1/3 of people prefer the hinge method: keeping your head, neck, and torso neutral (treating them as one unit), hinging on the bench, pushing your hips tall, and looking forward at the bottom and upward at the top.
Hinge Method
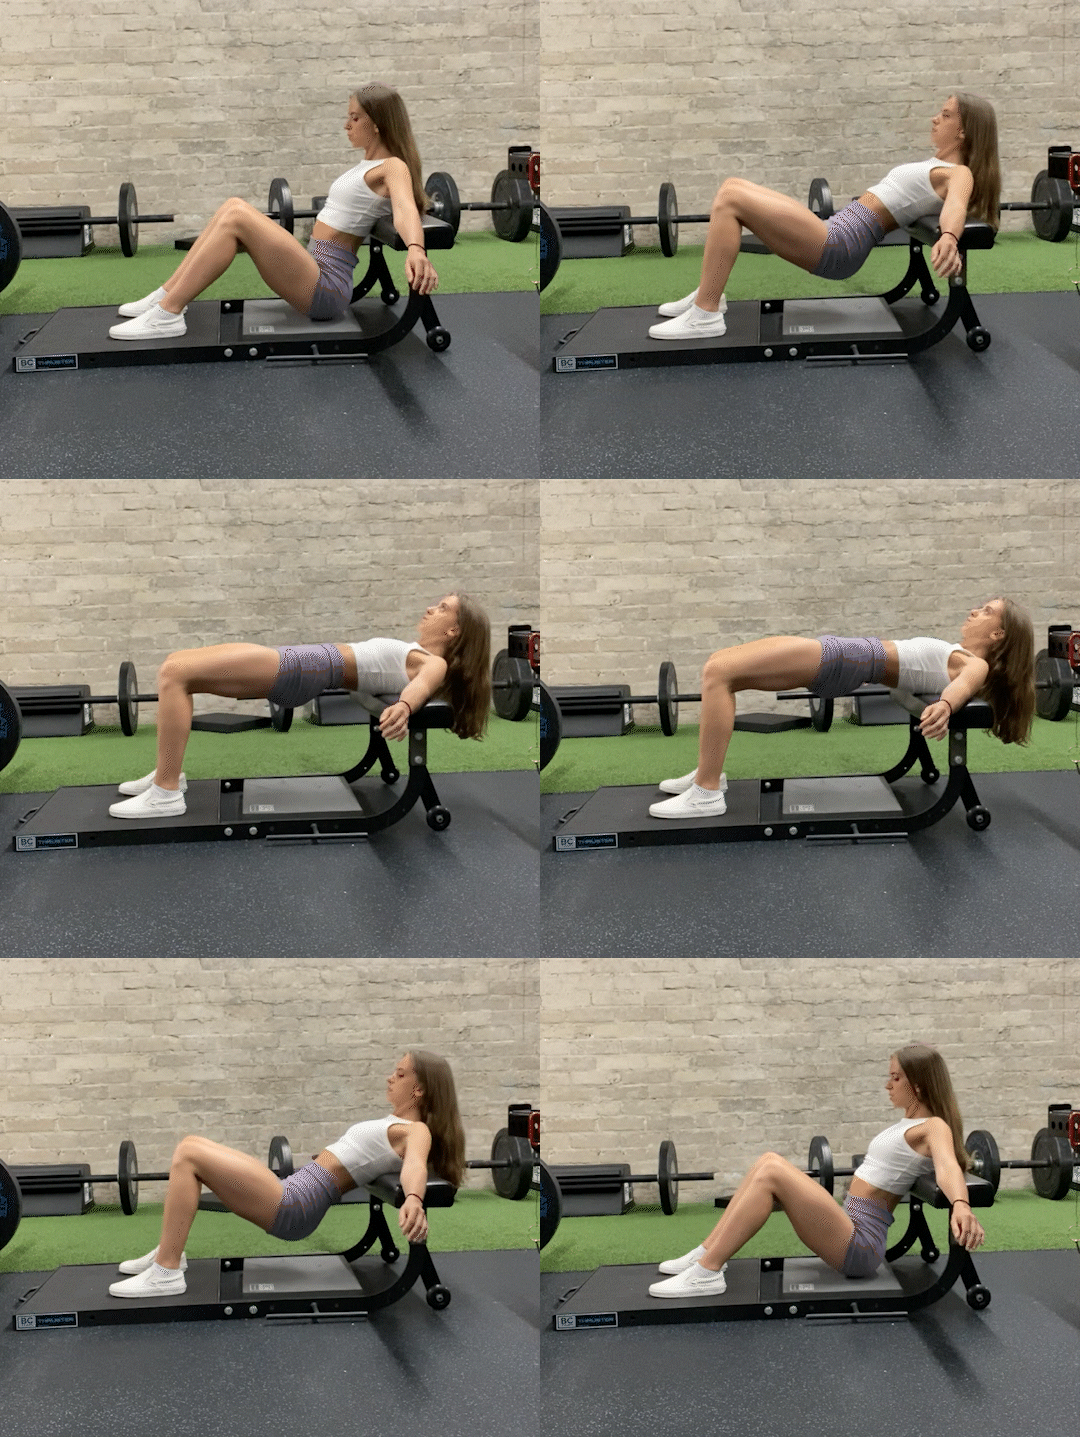
Scoop Method
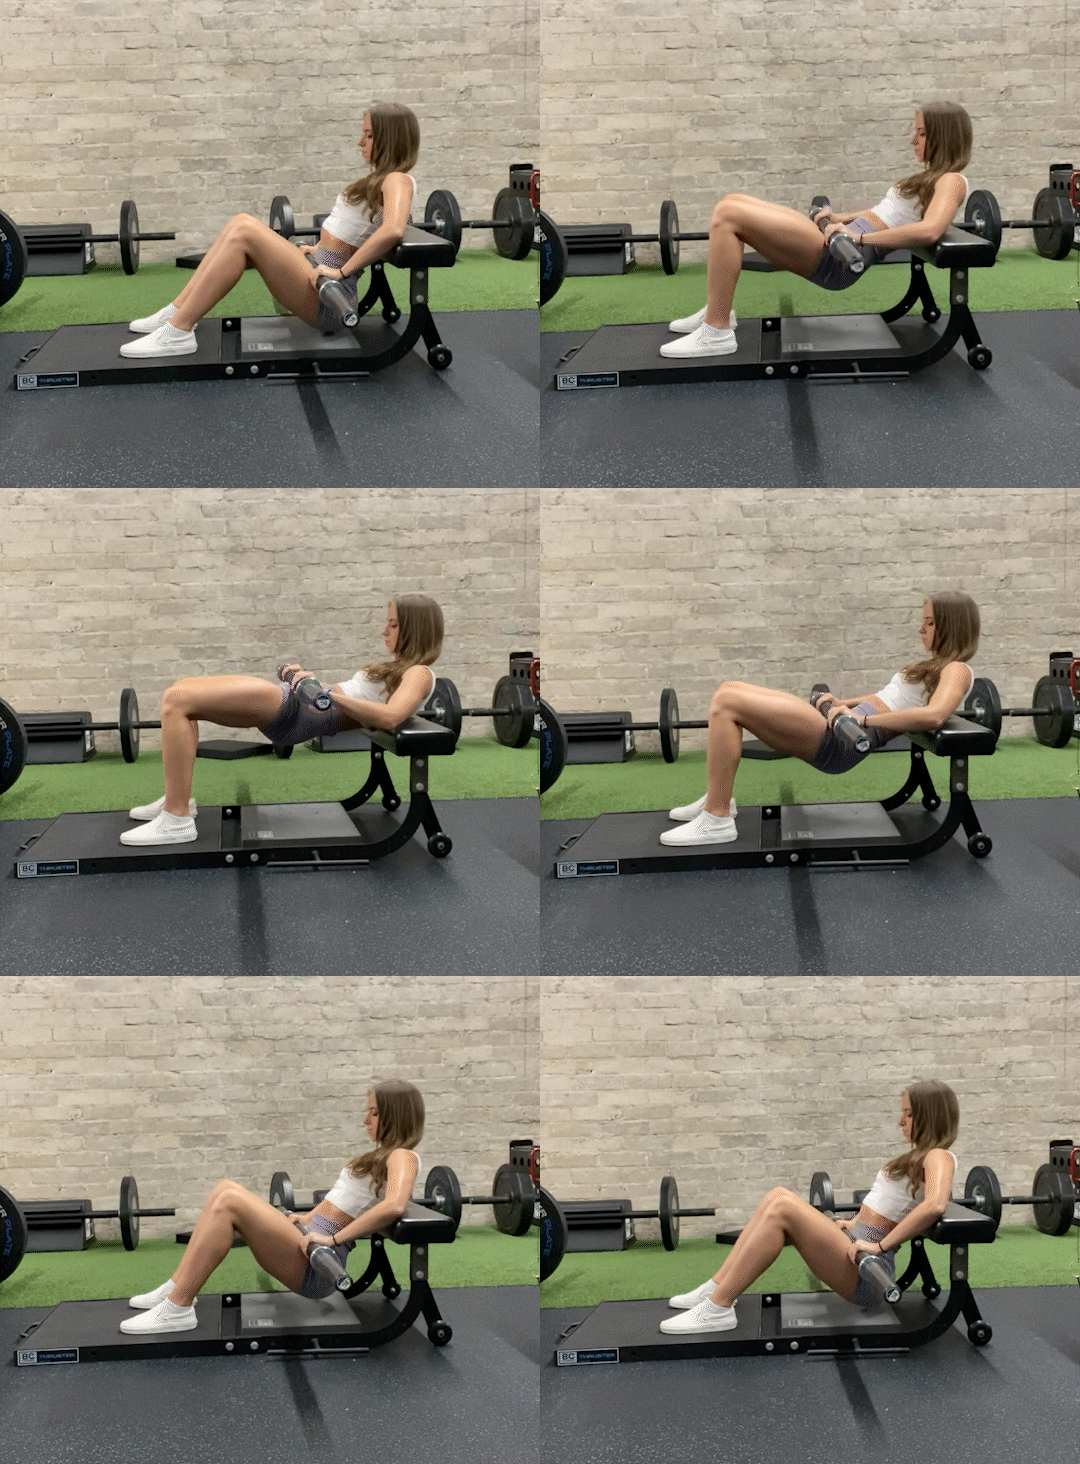
With the single-leg leg hip thrust, there aren’t two options for form. The scoop method is out. We only do the hinge method for the single-leg variation. Why? Because it makes it harder!
The reason why it makes it harder is twofold:
1. You’re moving your hips through a significantly greater range of motion and more importantly,
2. You’re moving a greater percentage of your overall bodyweight, meaning there is more loading on the hips. When you move just from the sternum down, the percentage of bodyweight that you’re moving is essentially from the sternum to the knees, whereas when you’re hinging, the percentage of bodyweight that you’re moving is basically from the neck to the knees. This may seem like it’s insignificant, but you can feel the difference.
Try this for yourself! Next time you perform single-leg hip thrusts, do a few reps of the scoop method (notice it will feel like you’re barely doing anything) and then do a few reps of the hinge method and you’ll quickly be sold.
Incorrect Form
Correct Form

With my Booty by Bret online training program, we often do 3 x 20 bodyweight single-leg hip thrusts, which is absolutely brutal for anyone if performed correctly.
However, for beginners, there are many ways to make them easier, and even for the strongest of thrusters – they can still do variations that will light their glutes up in lower rep ranges.
Here are most of the regressions and progressions that we use at Glute Lab:
Bodyweight B-Stance Hip Thrust
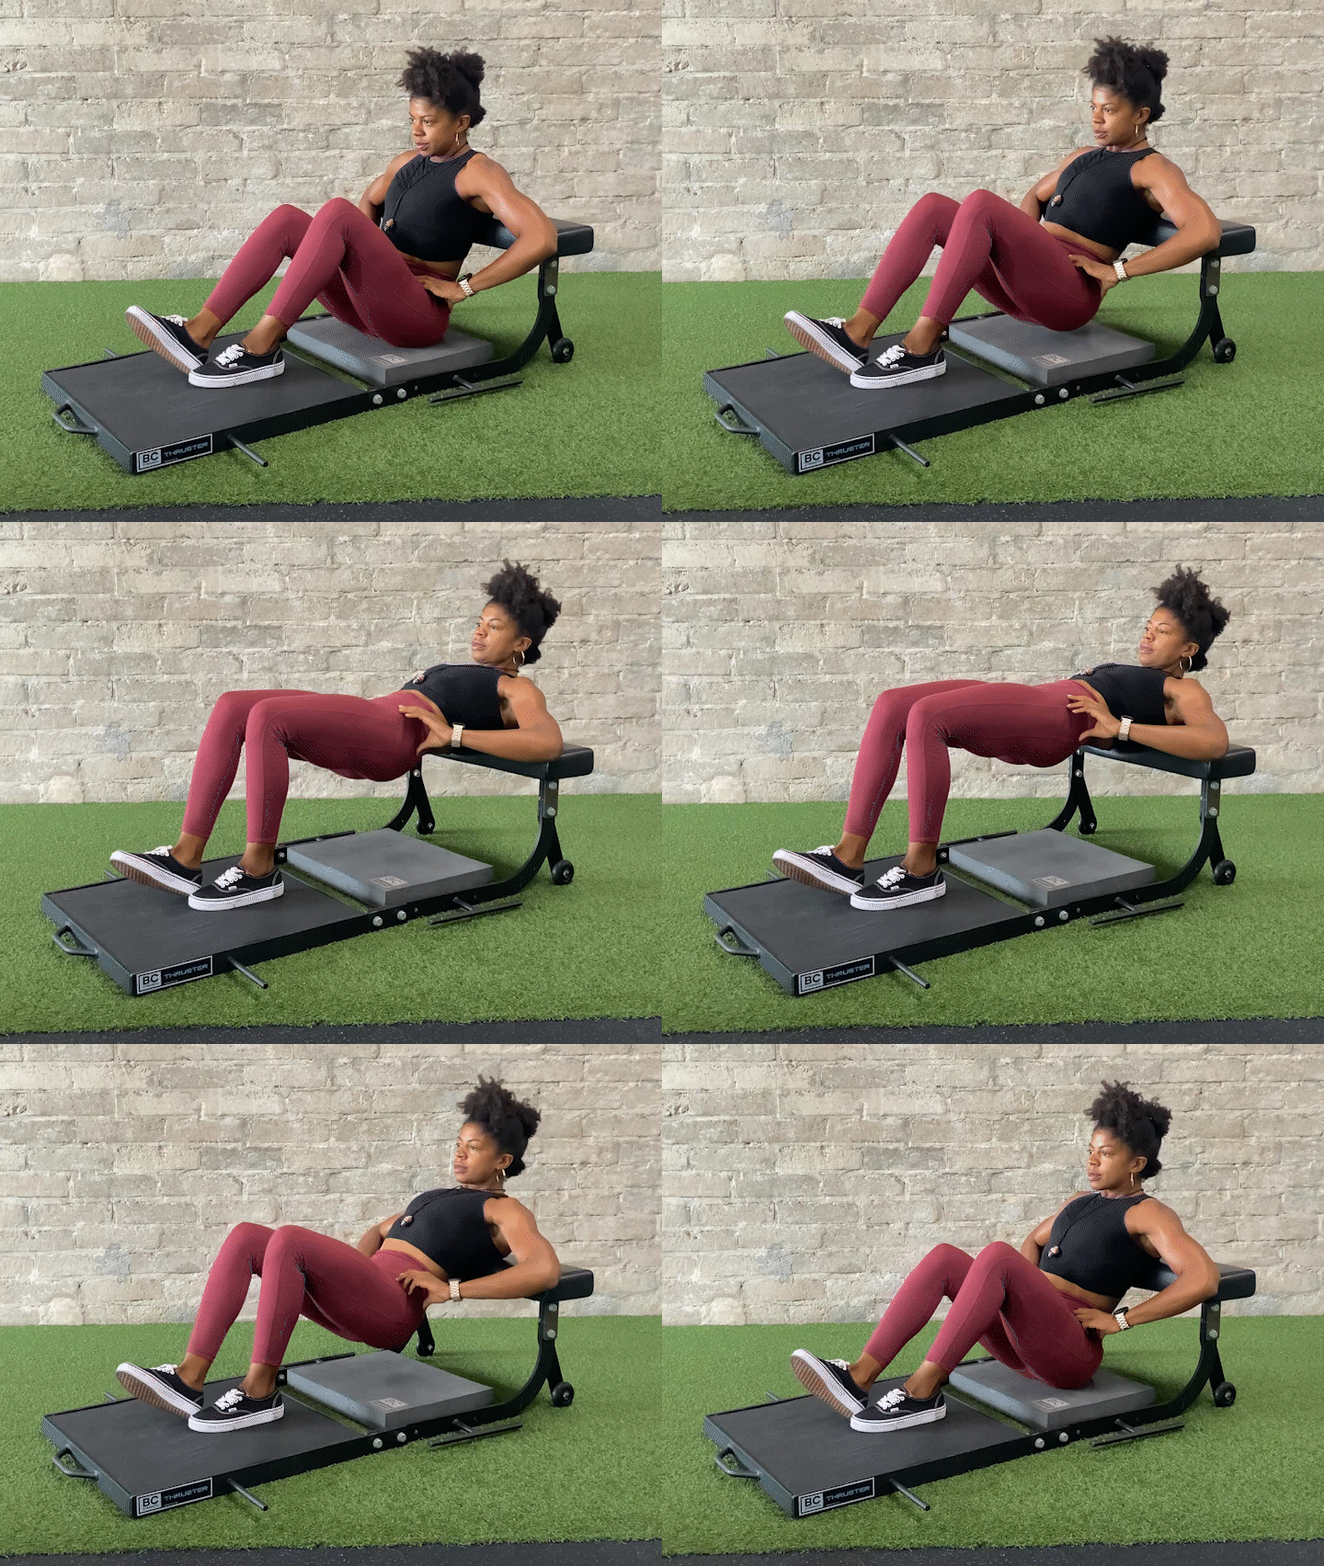
Bodyweight B-stance hip thrusts are especially great for beginners who want more of a challenge when it comes to bilateral hip thrusting, but aren’t quite strong enough to get in a few solid true single-leg reps. This is a pseudo single-leg movement aimed at placing around 70% of the load on your working leg with the remaining 30% on the assisting leg. These would be a good regression exercise to start building true unilateral strength.
Bodyweight Two Up/One Down
Single-Leg Hip Thrust
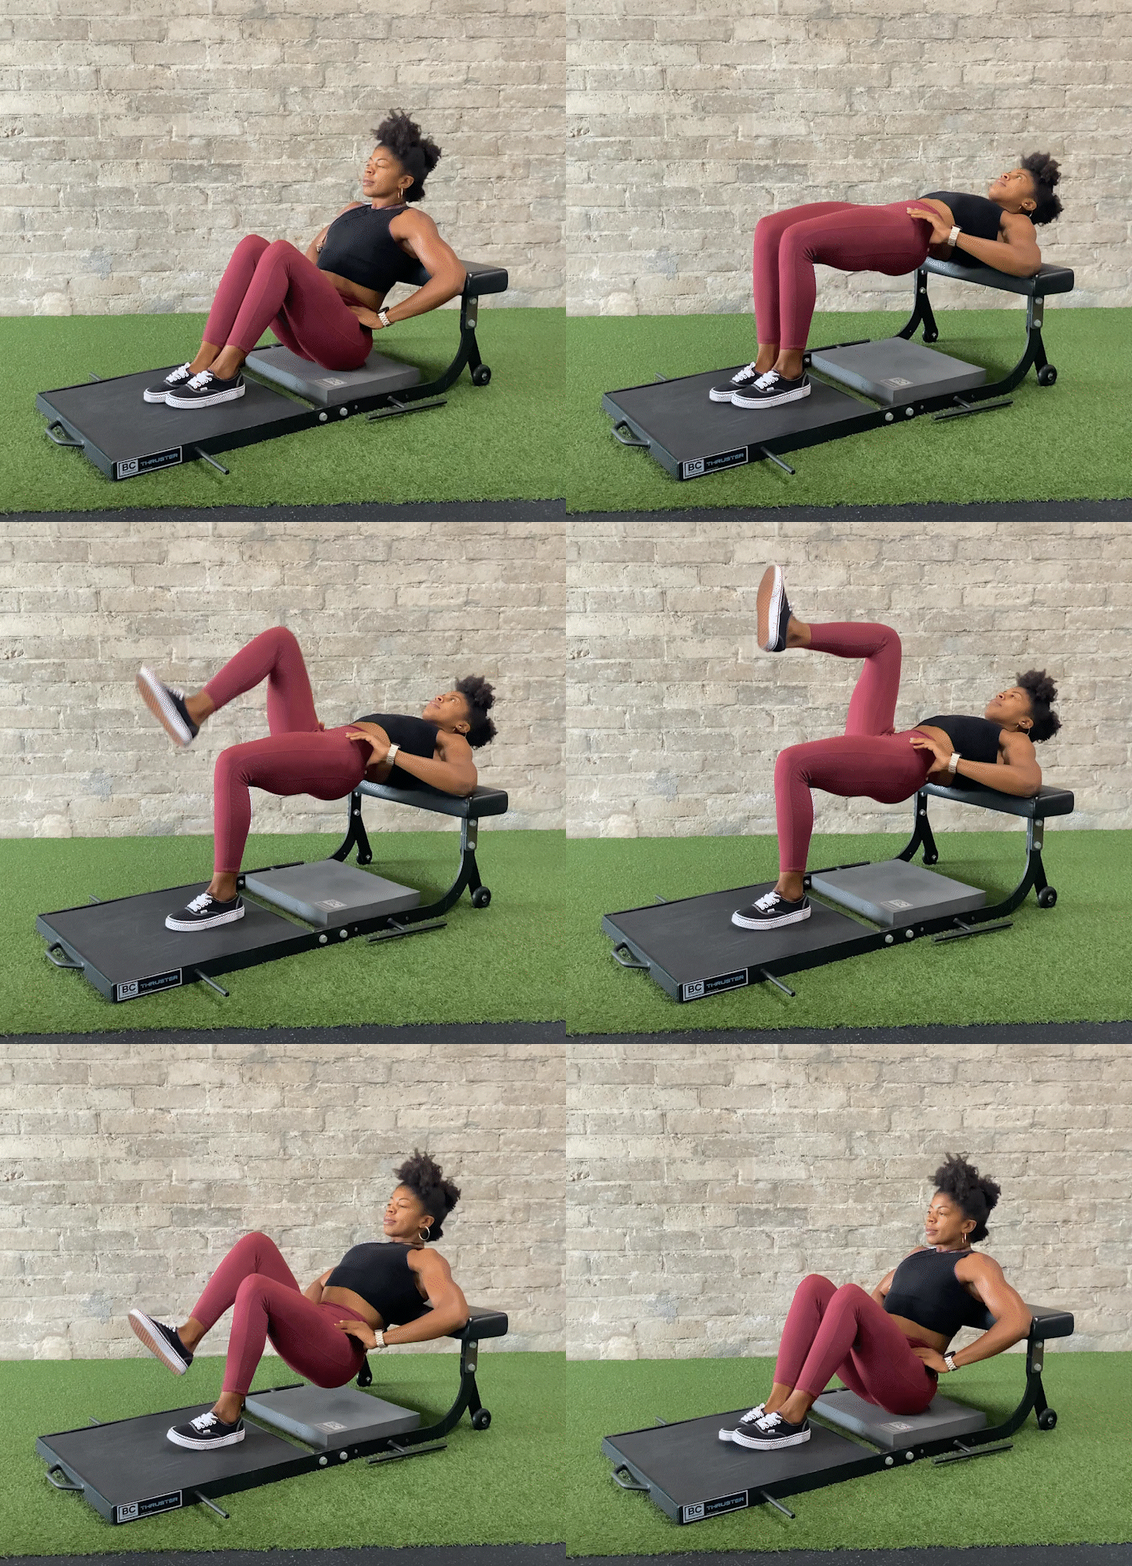
Here is another regression that will help to build unilateral strength by overloading the lowering phase on the working leg. You’re able to get to full hip extension with the help of your assisting leg (making it bilateral on the way up), then you’re lowering under control as you descend with one leg.
You will want to center your working leg as you would with a standard single-leg hip thrust and just place the assisting leg next to it to help get yourself up. The easiest way to achieve this is by putting the feet together during the set-up.
Single-Leg Hip Thrust
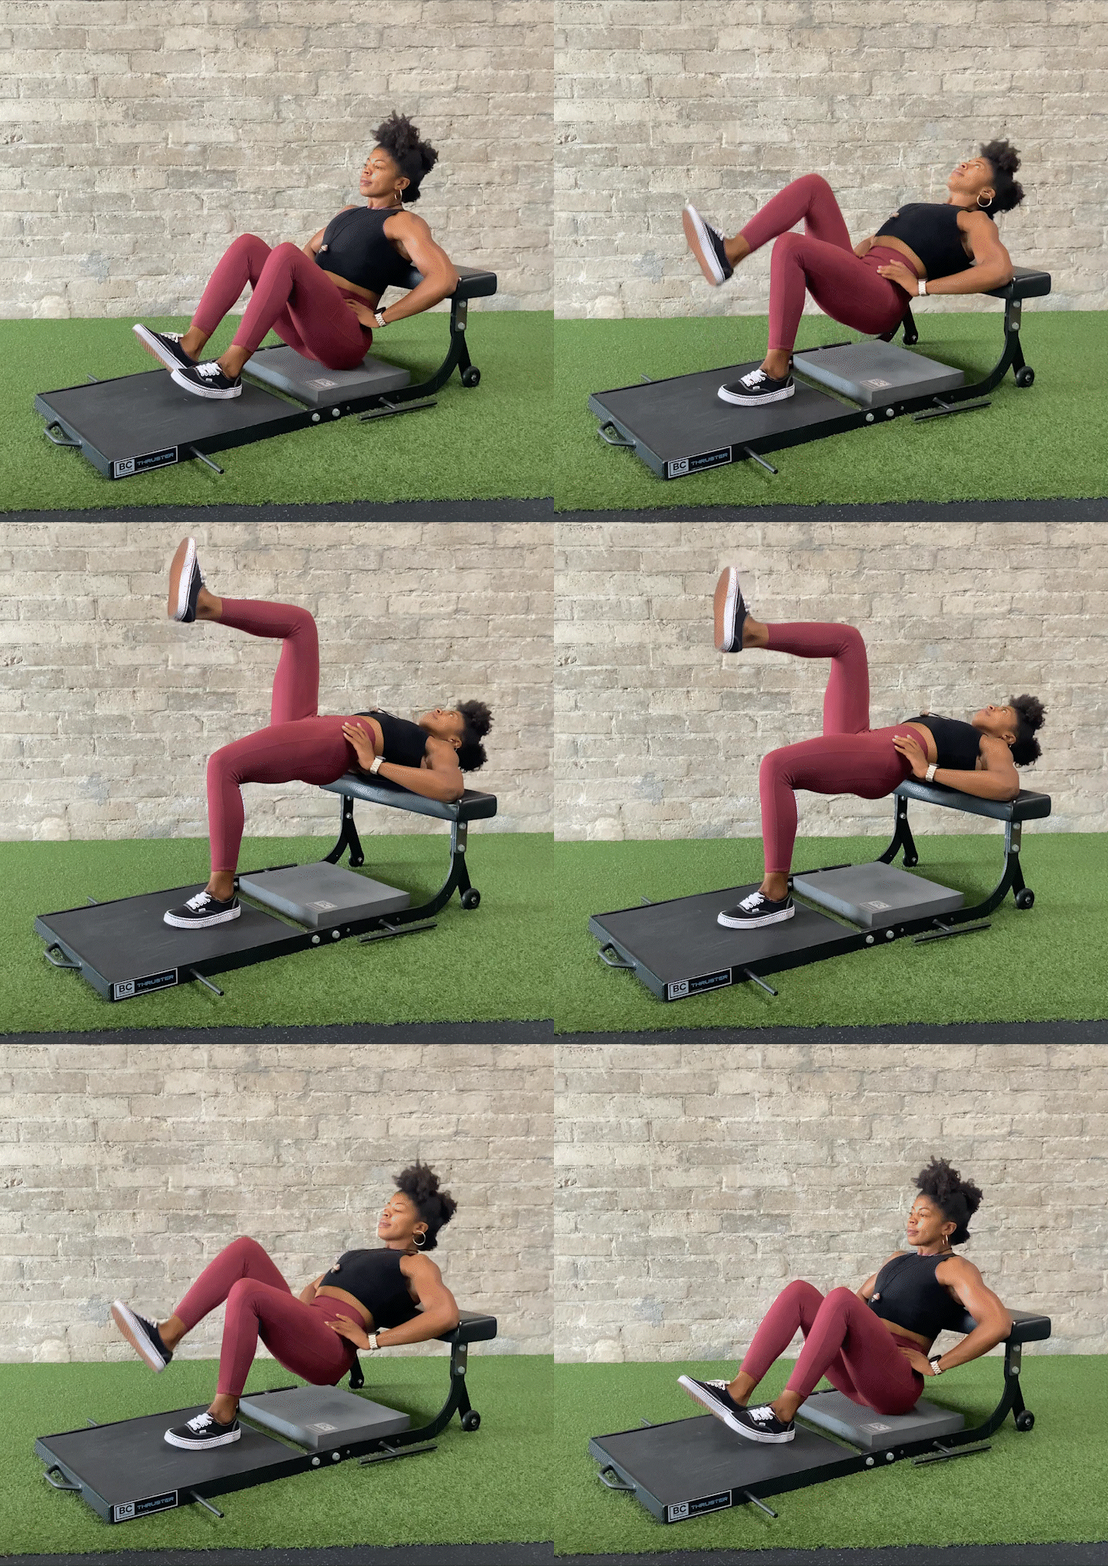
I already went over optimal form with these in the beginning of the blog, but a tip to help you feel your glute working hard is to think of initiating the movement by extending your hip instead of pushing your working leg into the ground to reach the top of the rep. And always squeeze the glute at the top of the movement and push yourself into full hip hyperextension. Think “push tall.”
Chain Single-Leg Hip Thrust
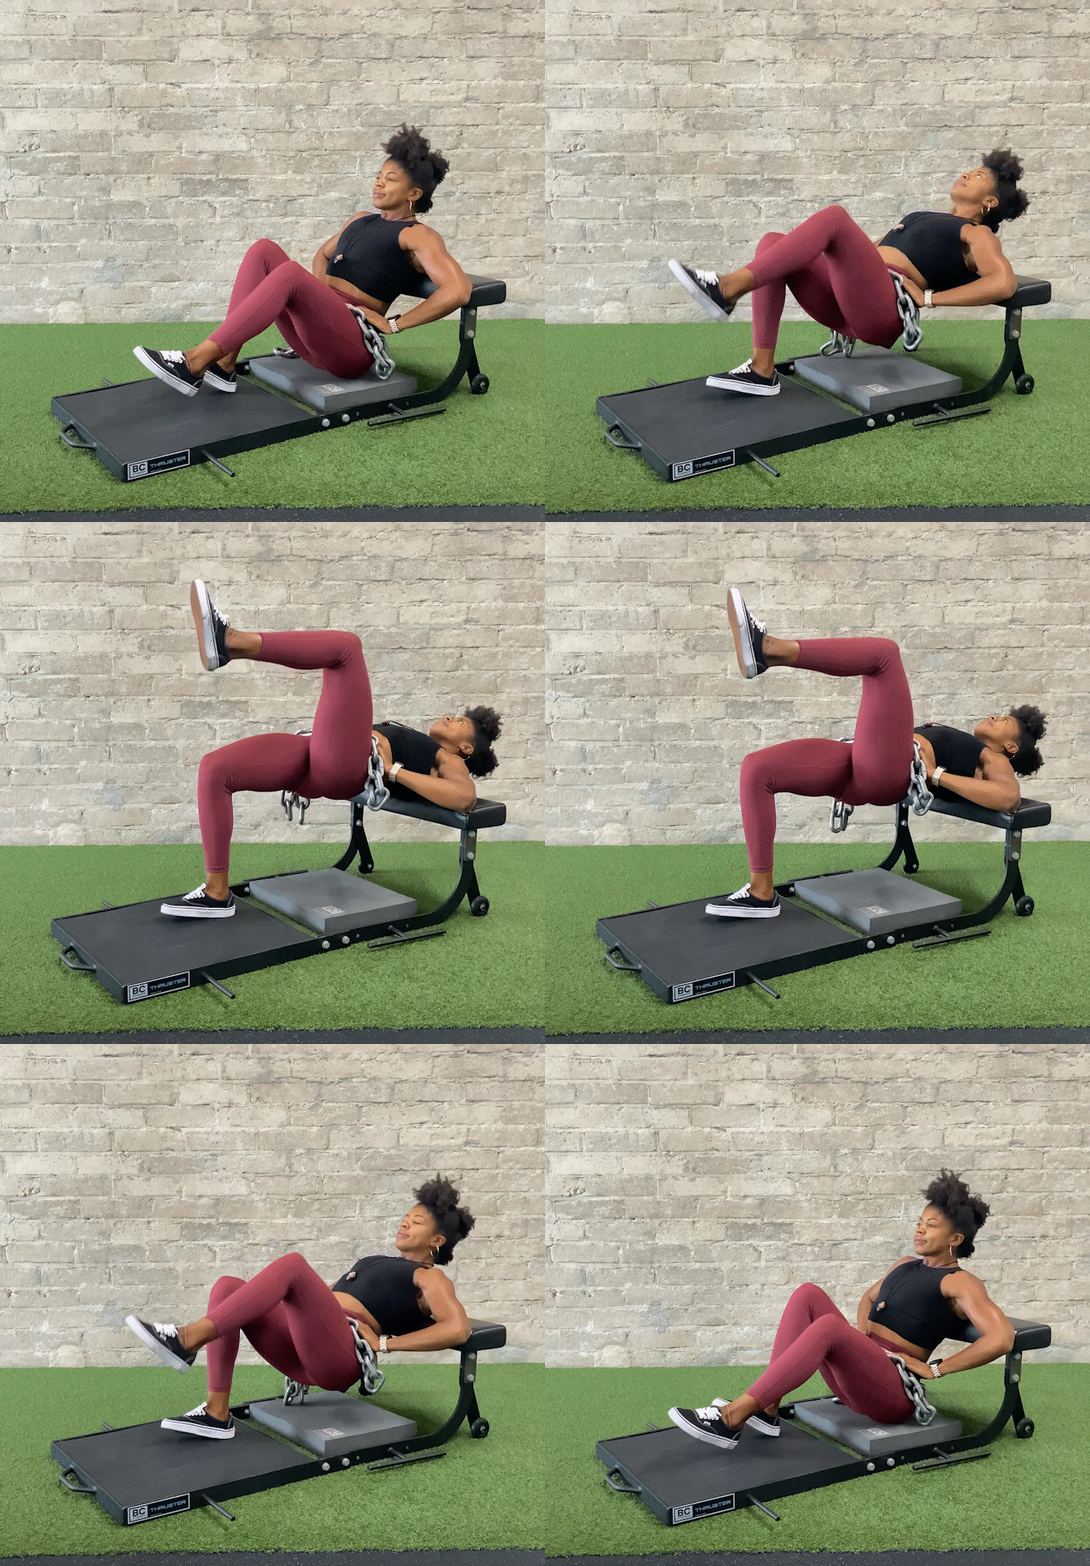
Moving into single-leg hip thrust progressions, some people tend to find placing a dumbbell over their hip is uncomfortable which got me thinking of how to more comfortably load this movement. At Glute Lab, we used to use a Bulgarian bag all the time and it felt fantastic. You can also lay a chain (or several) across your lap which is likely more accessible.
Db Single-Leg Hip Thrust
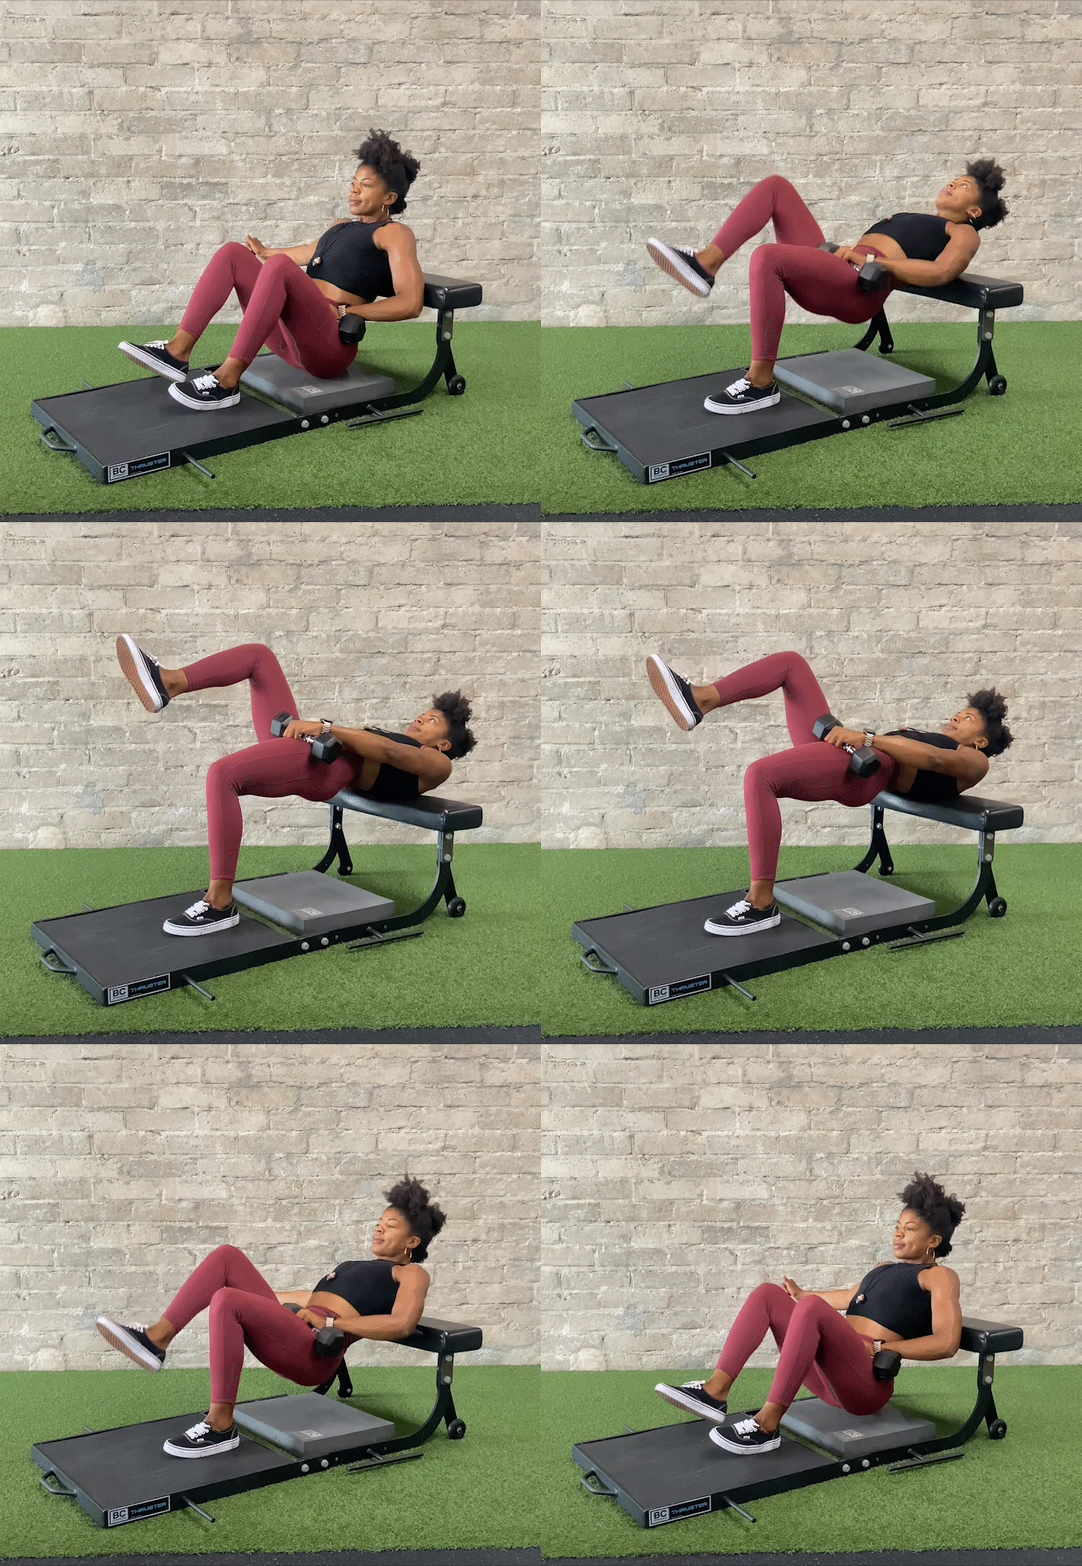
This is the most common way you’ll see people loading a single-leg hip thrust. You can either drape the dumbbell horizontally (or diagonally) across the upper thigh of the working leg (ipsilateral), or stack it vertically over the non-working (contralateral) hip depending on what feels more comfortable.
Smith Machine Single-Leg Hip Thrust
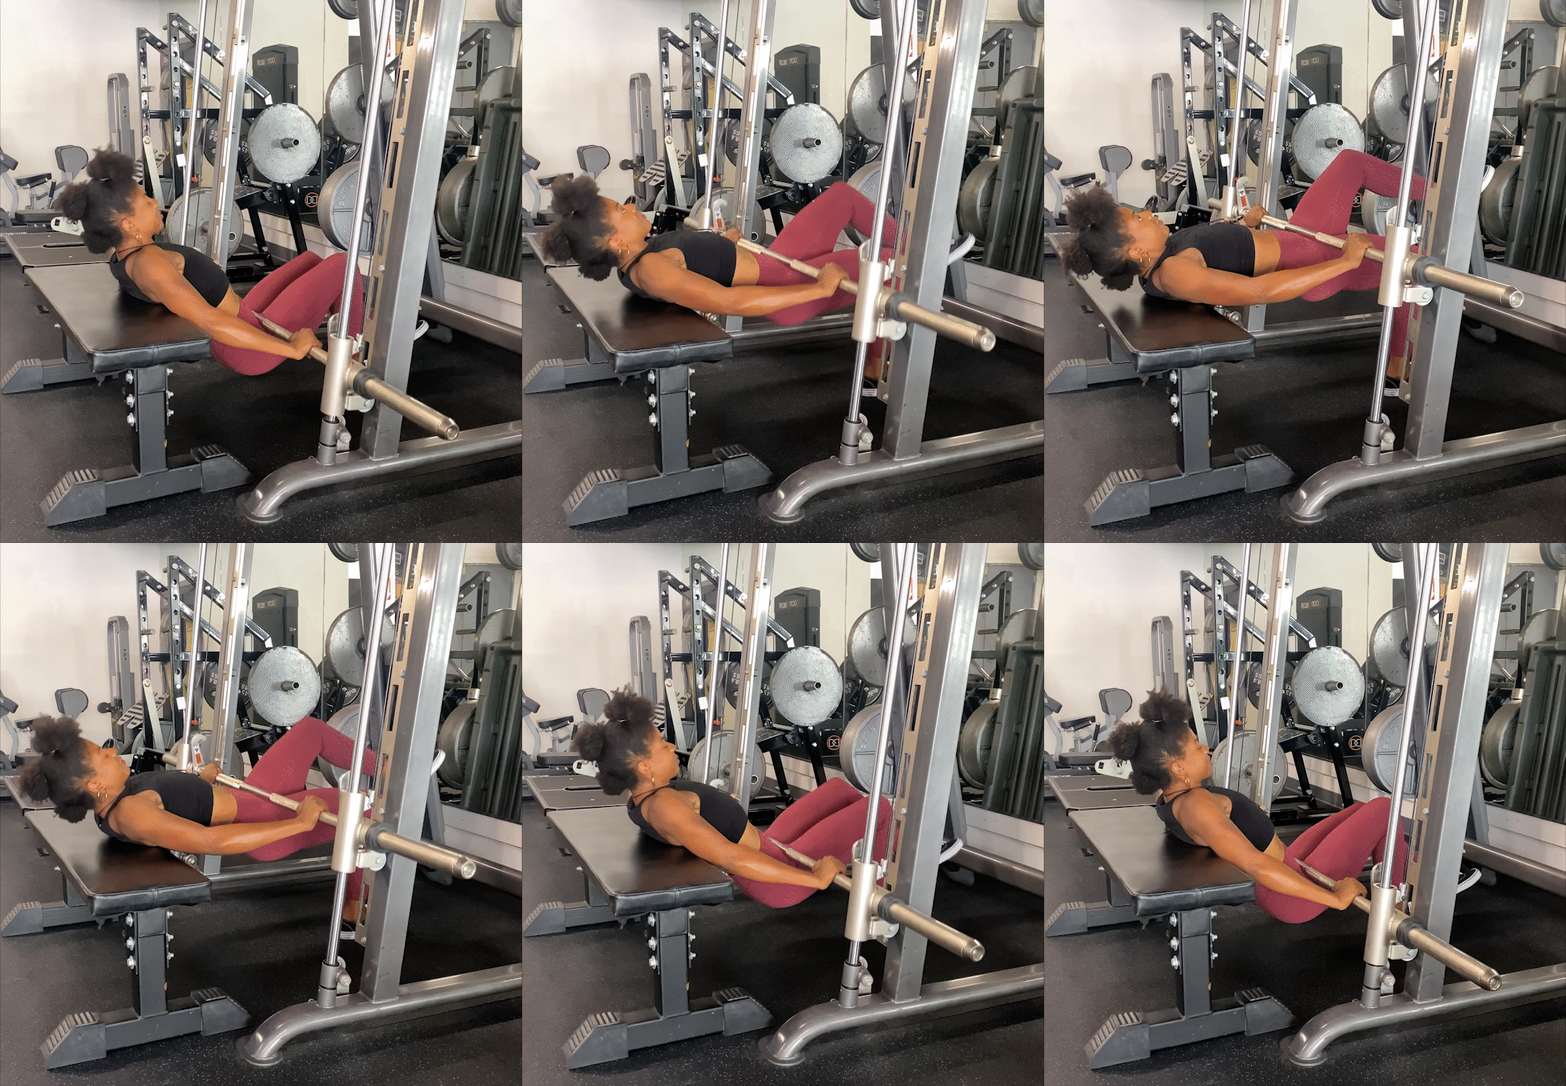
The smith machine used to receive a lot of flack in our industry, for no good reason. Not only is the smith machine a staple machine in bodybuilding, it’s a great way to load a single leg movement without having to worry about instability. I prefer smith machine single leg hip thrusts over barbell single-leg hip thrusts any day of the week, but that’s just me.
Band Single-Leg Hip Thrust (In Rack)
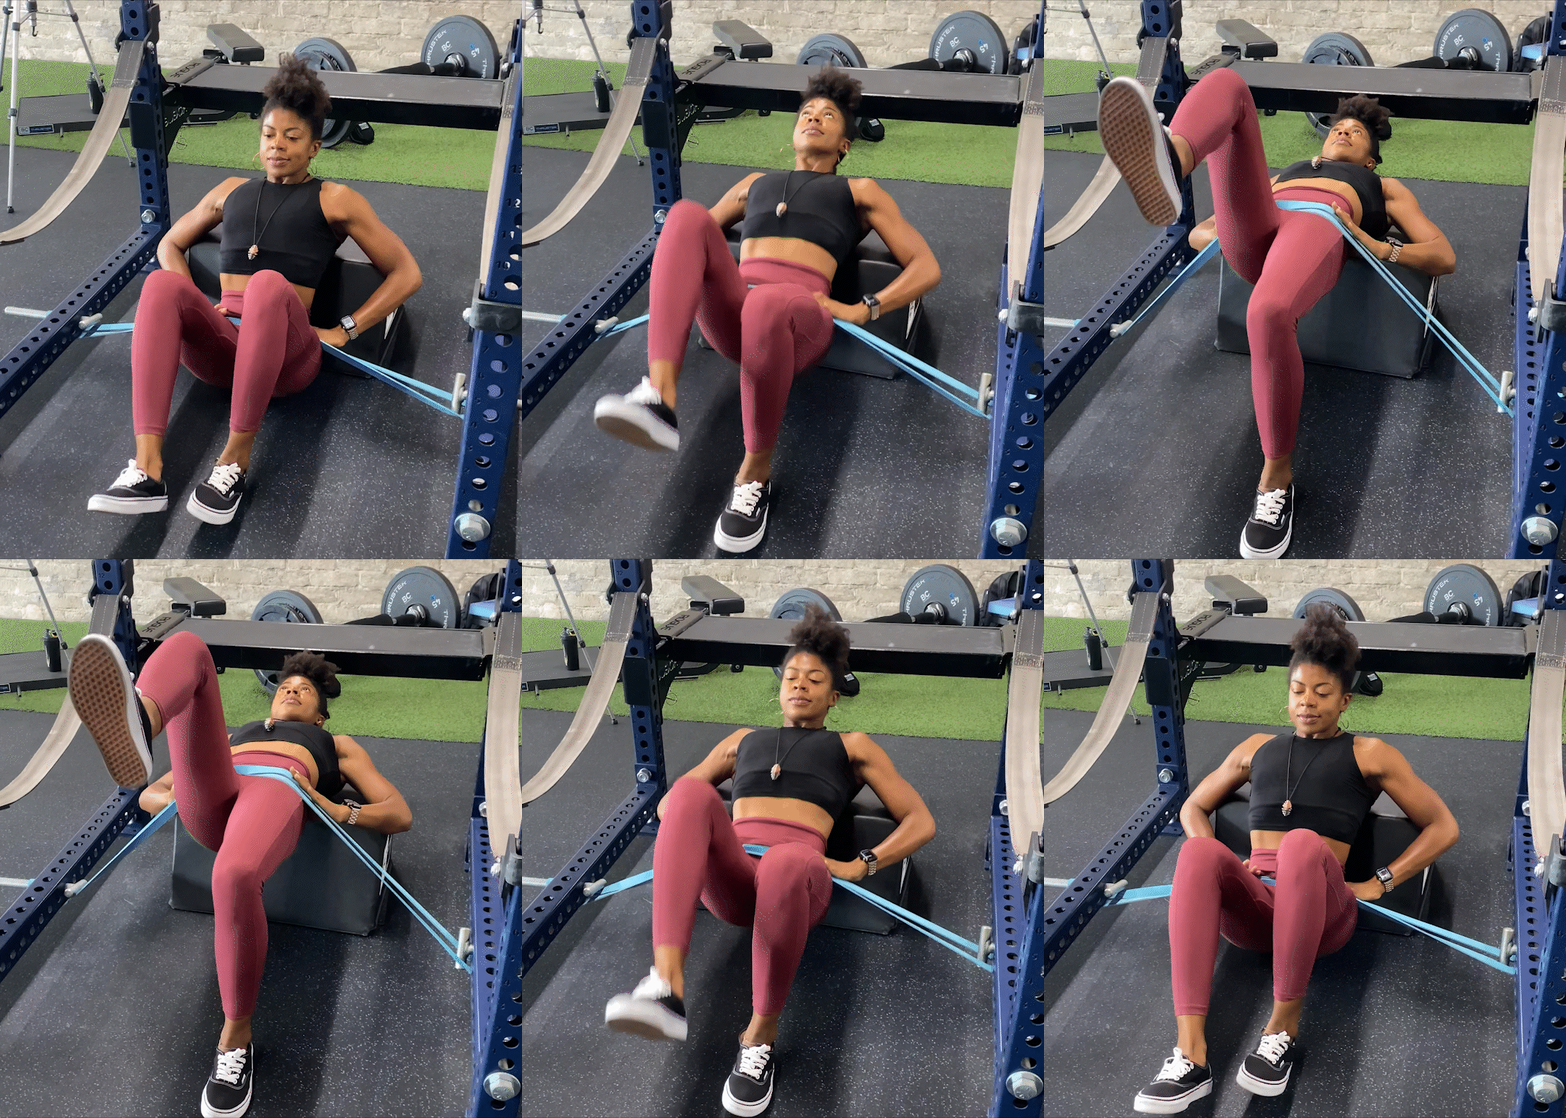
Accommodating resistance is a training method that attempts to match the strength curve of an exercise by incorporating either weight releasers, chains, or bands (usually in conjunction with a barbell) in order to increase the difficulty towards the top of the rep where the movement is strongest.
However, the hip thrust doesn’t get easier at the top like squats and deadlifts…it gets harder. The lockout is indeed the hardest part of the movement by far. For this reason, we use bands (not so much chains) a lot in order to strengthen the hip thrust lockout, since you’ll always be limited not by what you can get moving off the floor but by what you can achieve full hip extension with.
In this case, the method cannot be thought of as “accommodating” resistance since we aren’t accommodating the strength curve (flattening it out and making it more smooth in terms of resistance throughout the range of motion). Instead, it should be deemed “variable” resistance since we are purposefully making the hardest part of the movement even harder. At any rate, bands are amazing with hip thrusts, and we do band single leg hip thrusts, band bilateral hip thrusts, and bar plus band bilateral hip thrusts all the time at Glute Lab.
Landmine Single-Leg Hip Thrust
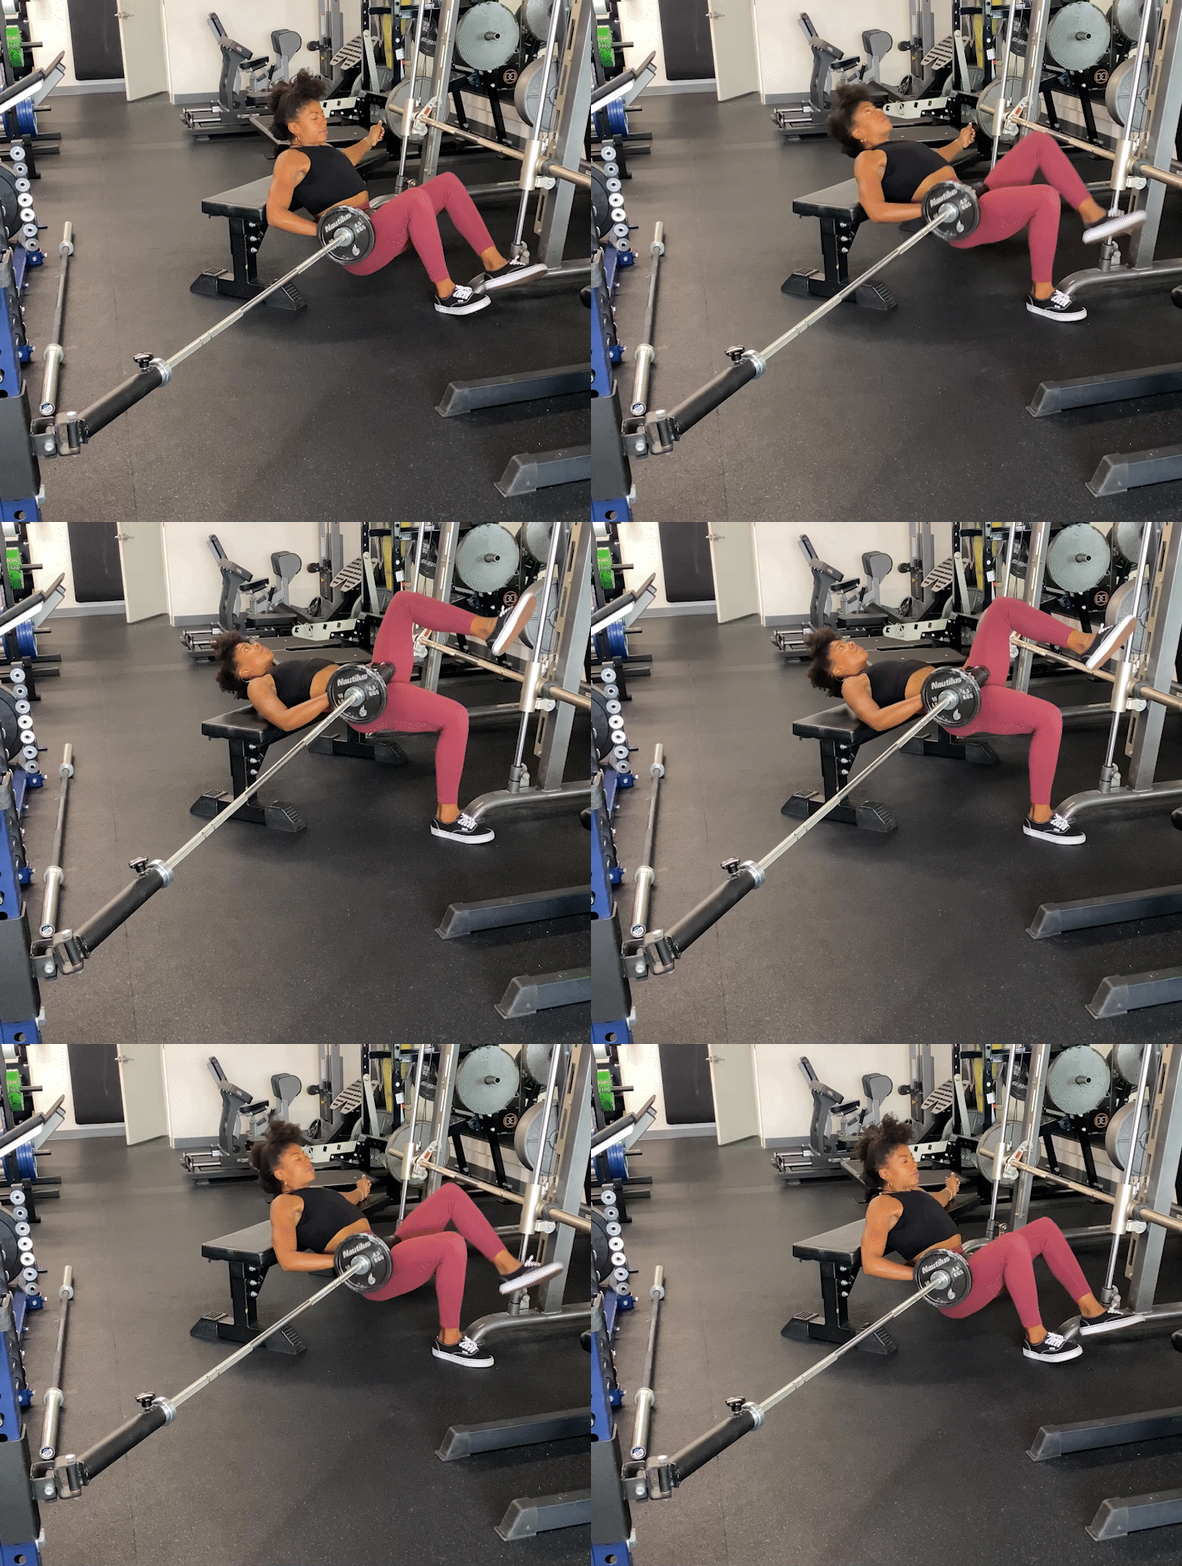
If you have access to a landmine set-up, it’s an awesome way to go heavier with your single-leg hip thrusts. You don’t have to worry about being in control of a heavy dumbbell; you can simply rest the end of the barbell over your working leg and it remains very stable. For this reason, it’s the preferred resisted single leg hip thrust method by almost all advanced lifters. Note that you’ll need to move the bench to the other side of the bar in between legs in order to hit the opposite limb.
Barbell B-Stance Hip Thrust
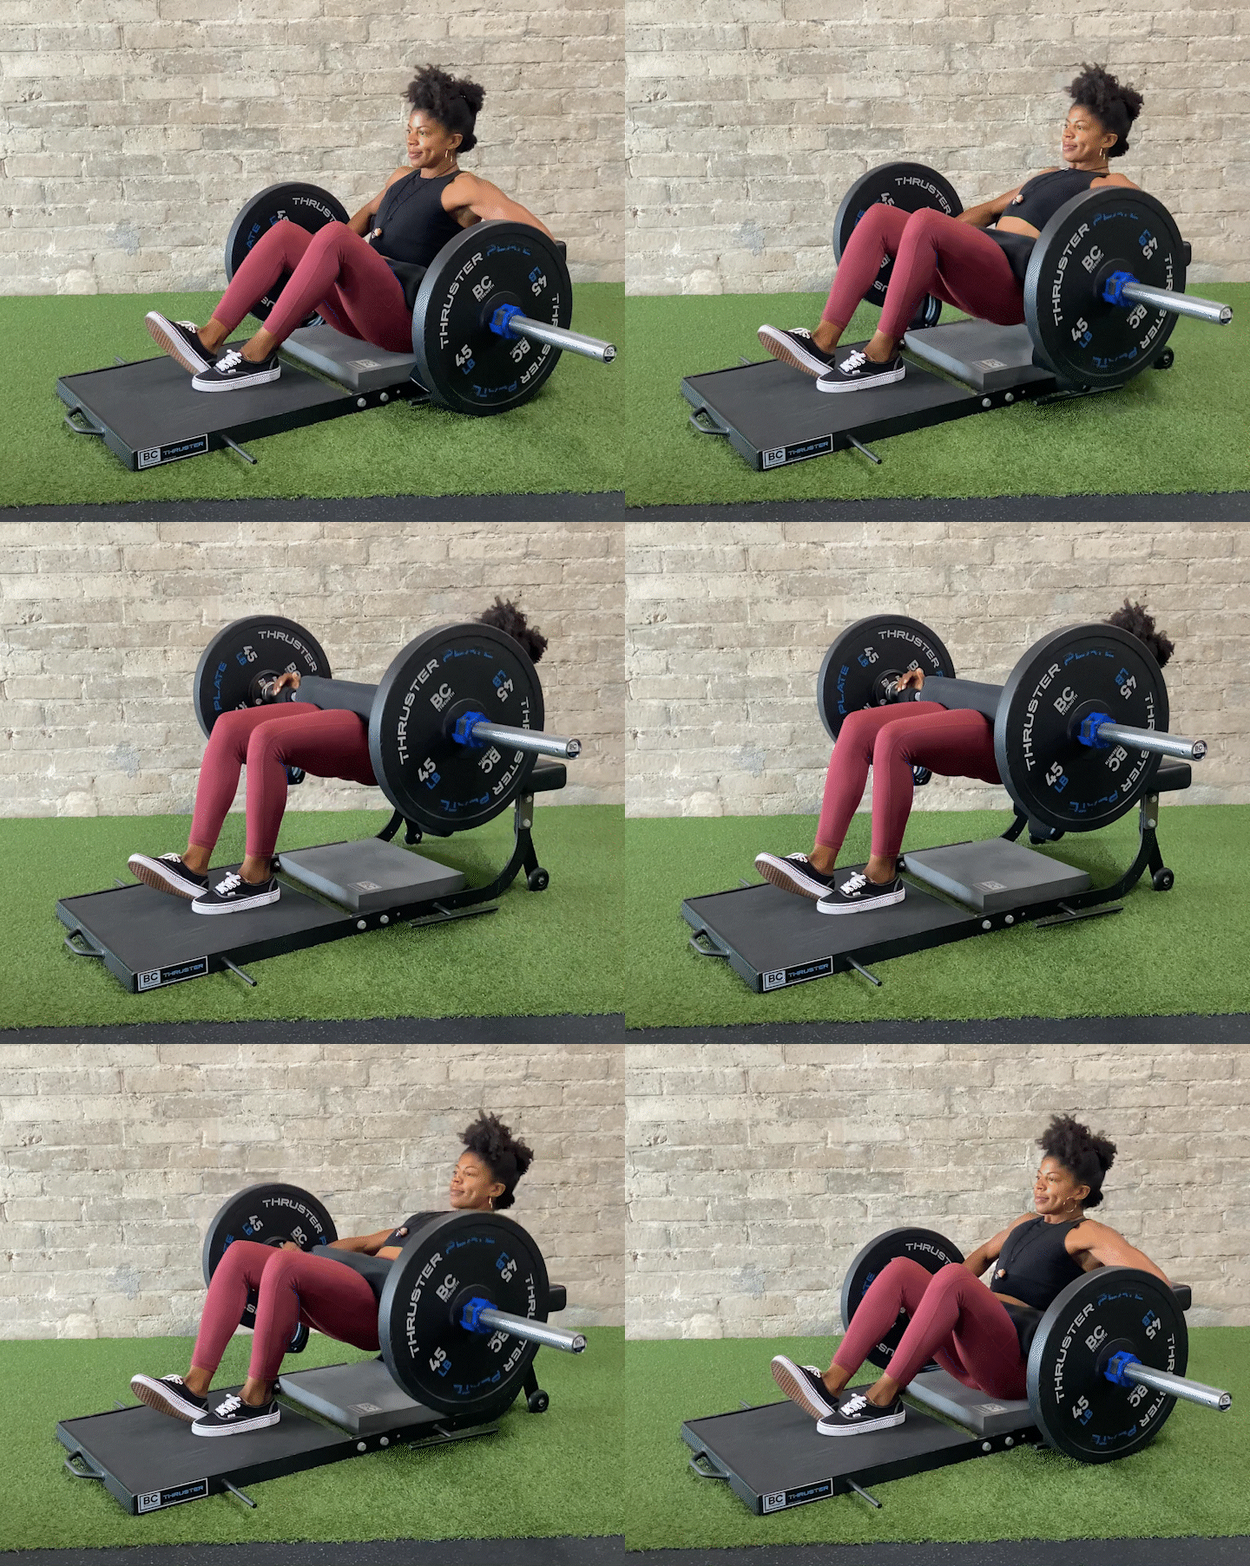
Same concept applies here as bodyweight B-stance hip thrust. Advanced lifters love this option as they can use much heavier loads due to the inherent stability. Please make sure that you’re trying to adhere to the 70/30 rule for working vs. support limb loads. I have some clients who use almost as much weight with b-stance as they do with their bilateral hip thrusts, and when this occurs you know that they’re using more like 60/40 or 55/45 split as one leg isn’t that strong! Always focus hard on isolating the working leg and not simply performing a bilateral hip thrust with an asymmetrical stance.
You will likely benefit from using a shorter barbell (Ashley is using my Thruster Bar here) for better stability throughout the set.
Barbell Two Up/One Down
Single-Leg Hip Thrust
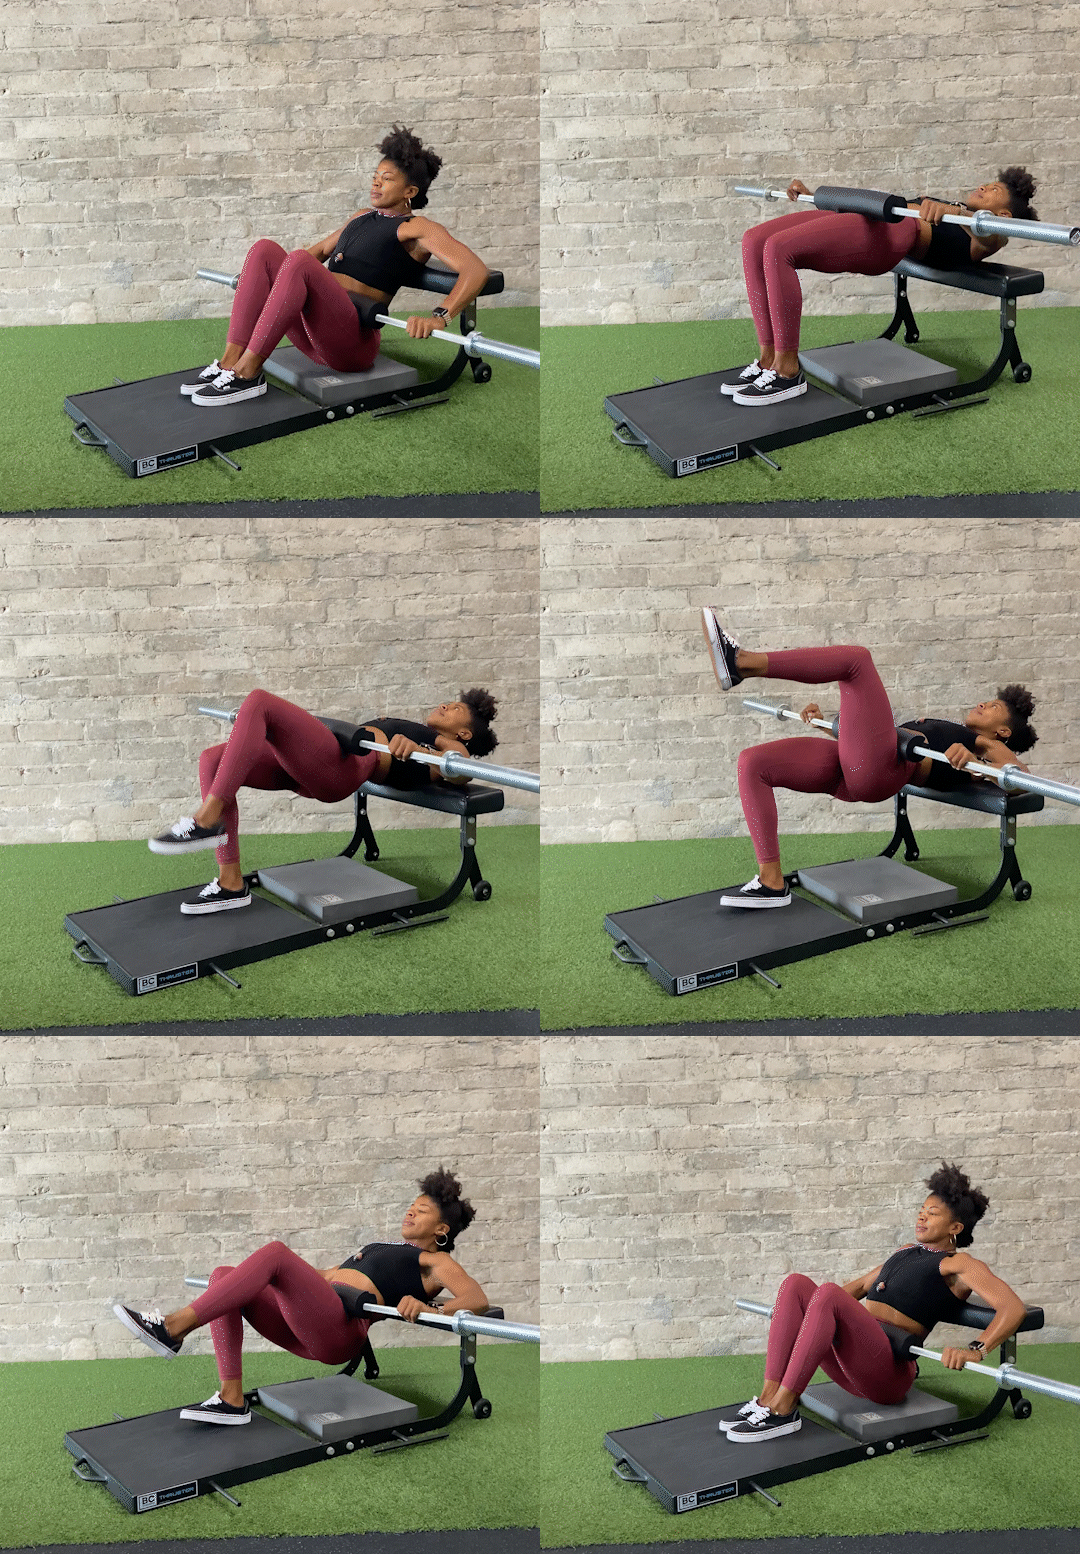
Same concept applies here as bodyweight two-up/one-down single-leg hip thrust. Place the feet together so they remain centered when you transition from bilateral to unilateral at the top of the movement. You don’t want a wide stance with single leg hip thrust variations as it will throw off your balance. Again, you will likely benefit from using a shorter barbell with this variation for better stability.
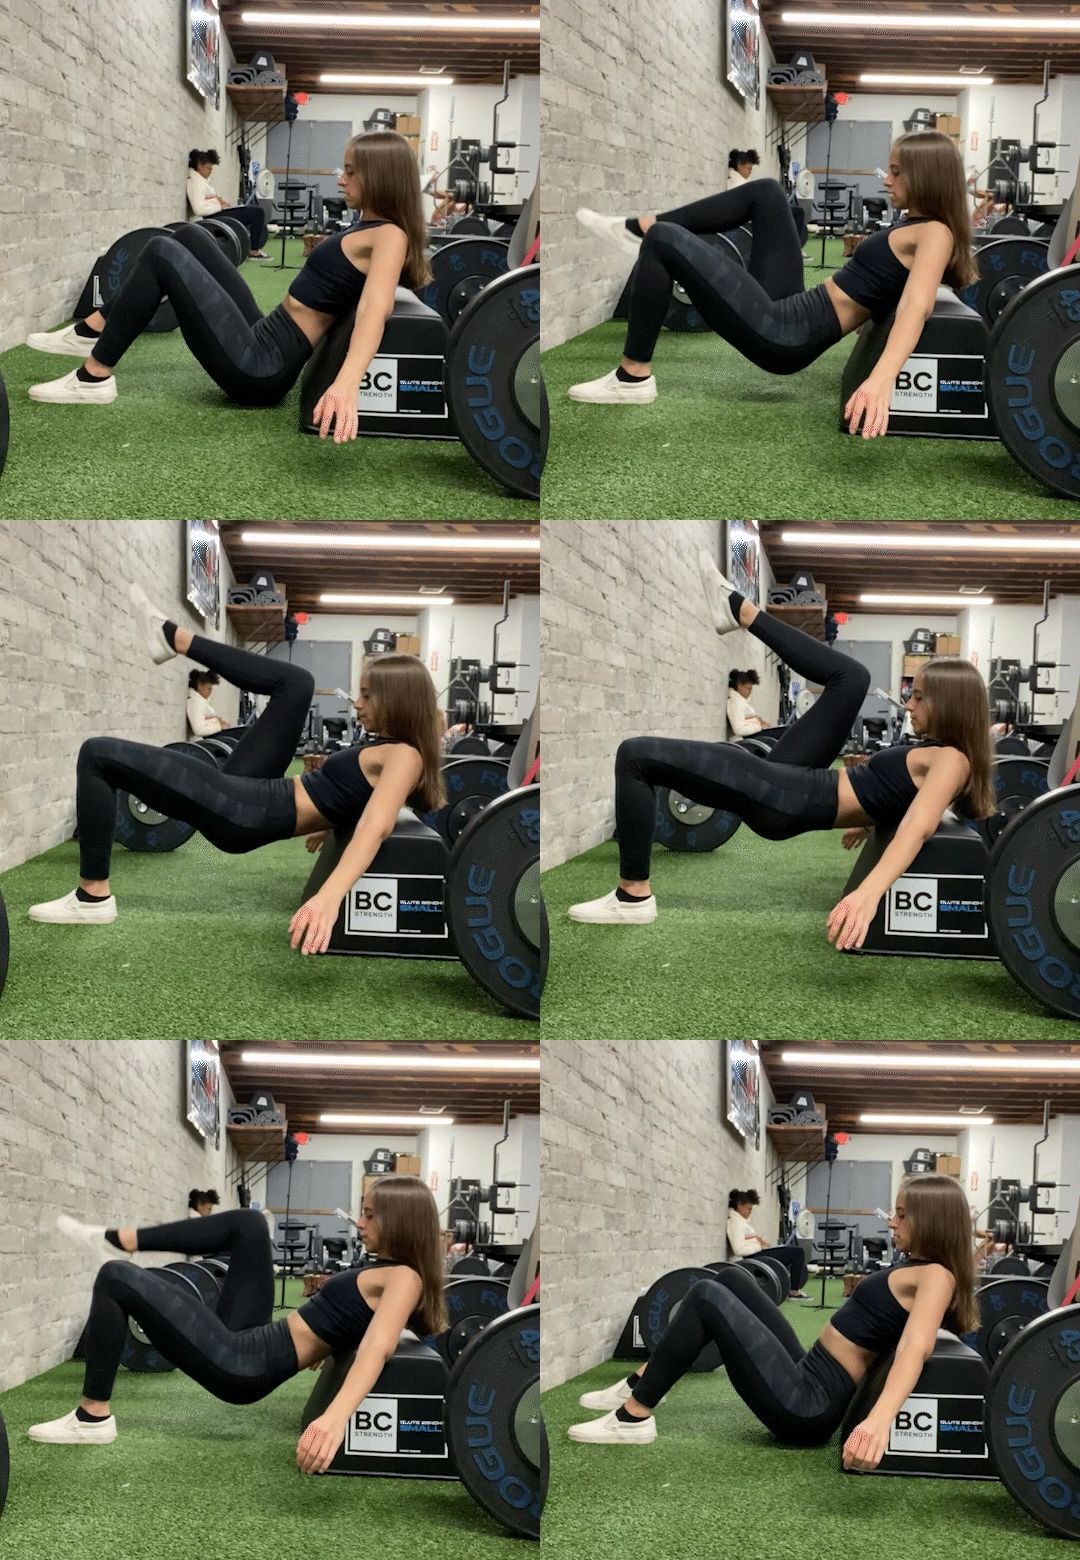
Dual-Elevated Single-Leg Hip Thrust
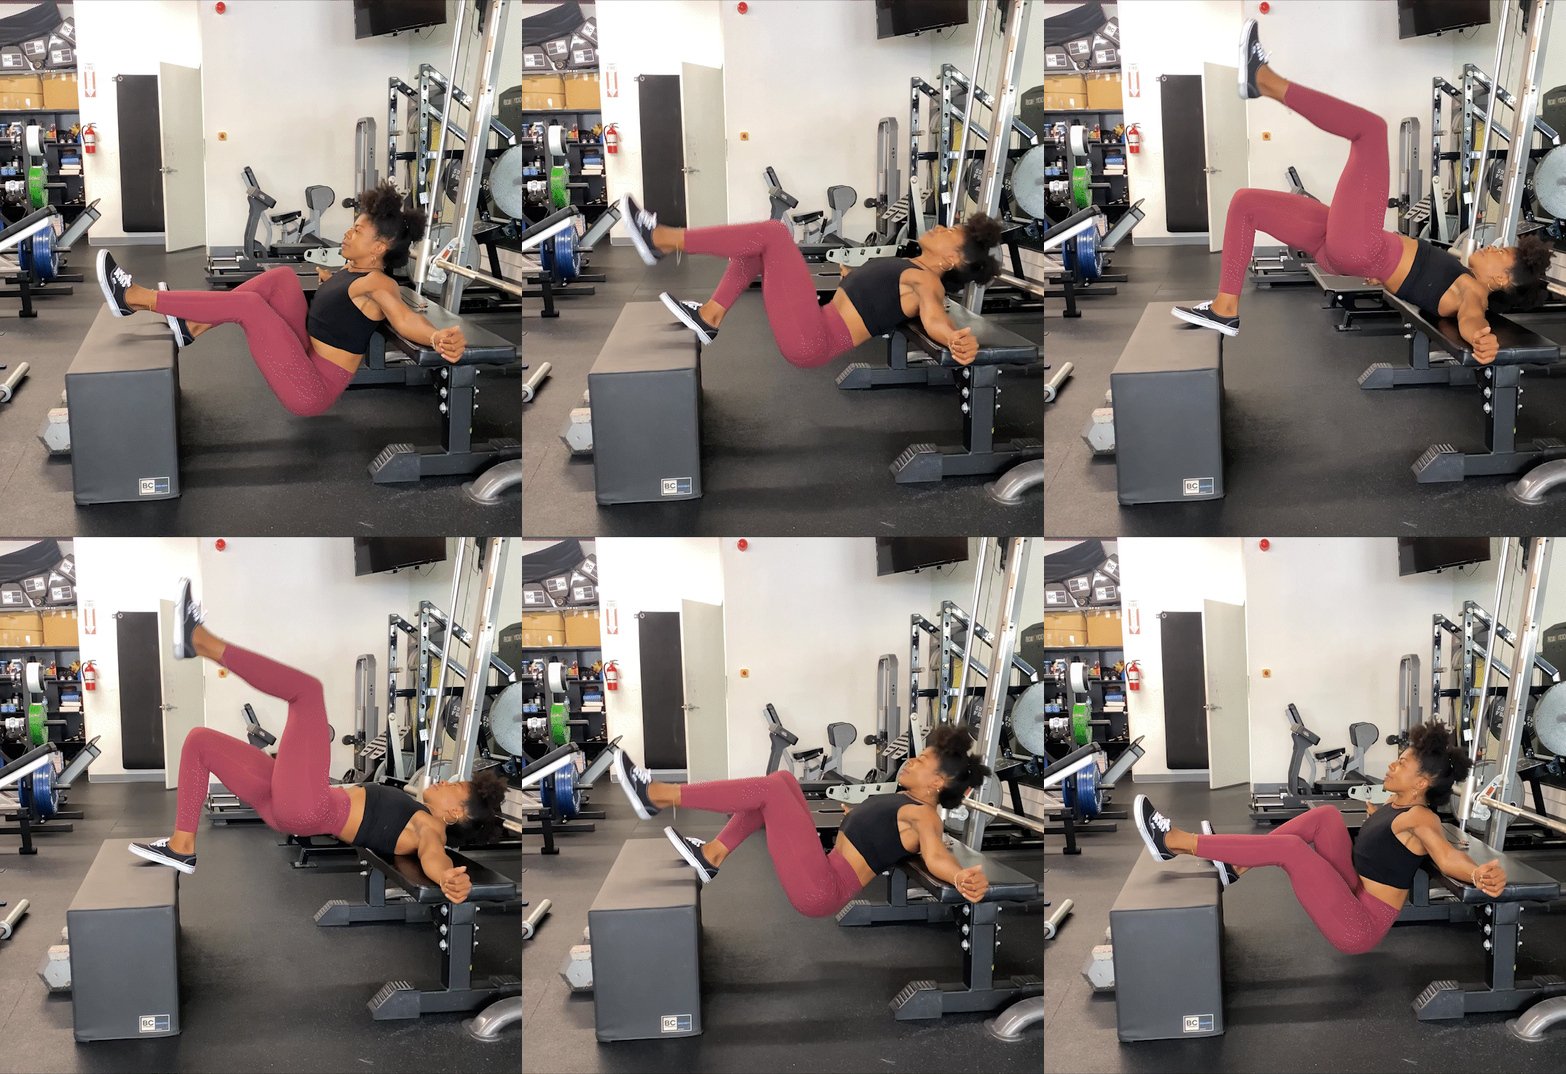
Elevating your foot will increase the range of motion, thereby increasing the difficulty of the movement. Be sure to play around with the distance between benches so you aren’t prioritizing your hamstrings (feet too far out) or quads (feet too far in) rather than your glutes. In addition, know that there are two options with regards to foot placement. Pushing through the heel placed on top of the bench involves more hamstrings, whereas pushing through the mid-foot place at the corner of the bench involves more glute. Make sure to descend deep on these; one of the main purposes of this variation is to get more hip flexion and a better stretch on the glute.
Chain Dual-Elevated Single-Leg Hip Thrust
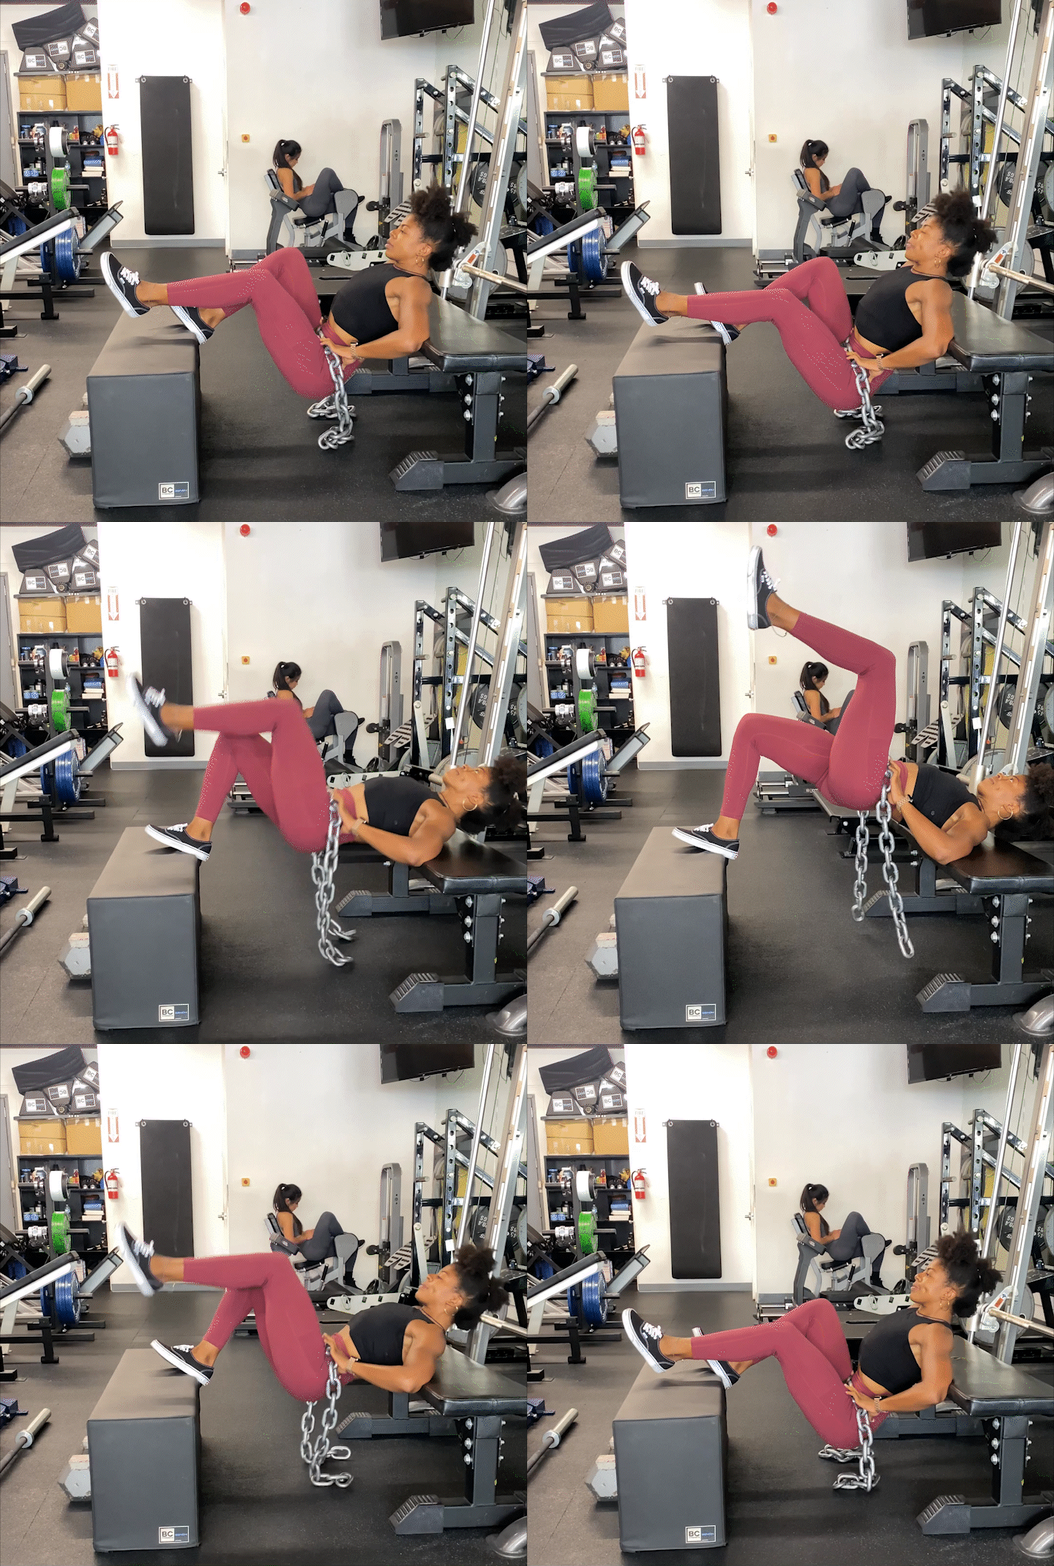
This is going to be the hardest variation of all. Not only are you increasing the range of motion, but you’re also adding external load. These would likely be performed in the lower rep range because of how brutal they are. As I mentioned in with the chain single-leg hip thrust, having a load that can be draped across your lap will likely be the most comfortable option as you don’t have to worry about a dumbbell getting in the way when you go down into deep hip flexion at the bottom of the movement.
Takeaway
Always be open to trying new variations as it keeps training exciting and you may find that you prefer certain methods over what you’ve been used to doing. Variety is the spice of life in strength training. If you’re doing it right, you’ll always be performing the same big, basic movement patterns (which includes hip thrusts), but switching up the loads/rep ranges, number of limbs, load placement, stance/grip width, type of resistance, tempo, etc.
Single-leg hip thrust variations can be performed by all, regardless of your initial level of strength. If you’re just starting out, start with bodyweight B-stance hip thrusts and move your way down the list of progressions as you get stronger over time.
Building single-leg strength will certainly transfer over to a stronger bilateral hip thrust over time, so don’t be afraid to incorporate one of these into your next program!
See the Instagram post I made HERE
Thanks to Jamie DeRevere and Ashley Hodge for demonstrating!


