The first rule of hip thrusting: Never make direct eye contact while hip thrusting or when someone else is hip thrusting…things can get awkward rather quickly.
Don’t Be This Creep!
At this point, many lifters, especially my readers, believe the hip thrust to be the best glute development exercise. However, the hip thrust also activates the hamstrings, quadriceps, and adductors very thoroughly as well. Therefore, it will help develop the entire thigh musculature. Throughout the movement, the glutes stay under constant tension, and back strength is not a limiting factor, which cannot be said of other popular glute building movements. This allows for maximal loading of the glute musculature.

Tim Tebow knows what’s up
The hip thrust can be performed for a variety of different reasons. Although the popularity of the hip thrust is rising, I still feel its importance is underrated for aesthetics, athletic development, and absolute strength.
The four primary reasons one should perform hip thrusts include:
- Improve the size, strength, and appearance of the glutes
- Increase acceleration and sprint speed
- Increase bottom squat and deadlift lockout power
- Improve functioning of the entire body since the glutes influence foot, ankle, knee, hip, pelvic, and low back mechanics
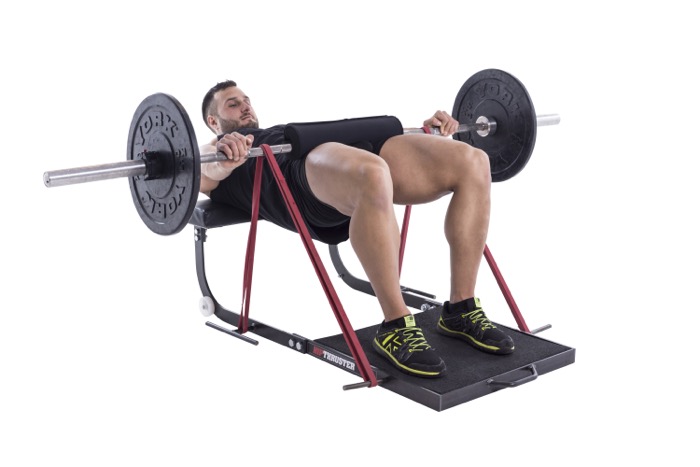
The Hip Thruster is the best way to do the hip thrust – stable and versatile!
Ways to load the hip thrust
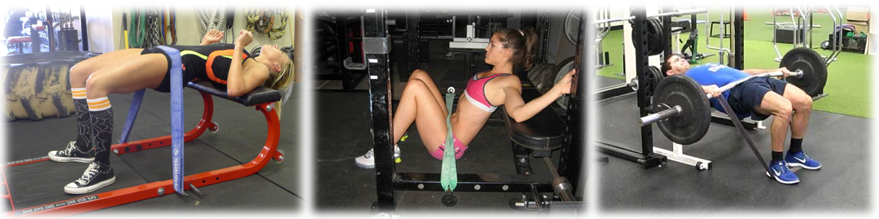
Below are the most common ways to increase the challenge of the hip thrust after mastering bodyweight:
- Barbell
- Band
- Sandbag/Chain/Kettlebell/DB (chain variation shown)
- Single Leg Variations
- Shoulder and Feet Elevated Variations
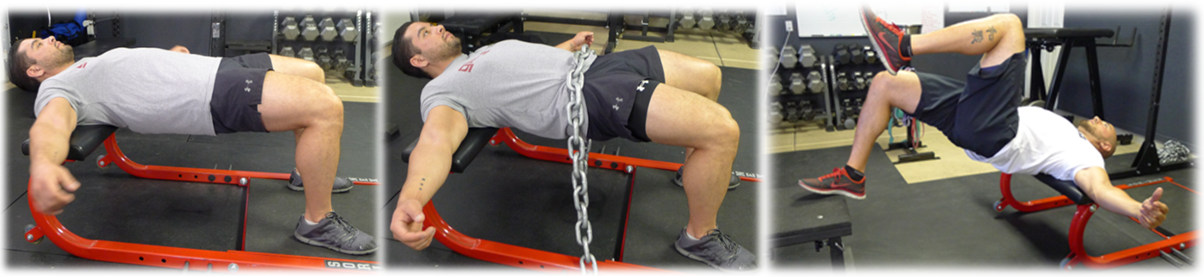
Left: Bodyweight, Center: Chain Loaded, Right: Single Leg with foot elevated
The Set Up
Bench Height
Through experimenting with different bench heights, I believe the optimal bench height is around 16 inches. This is what most clients feel most comfortable with which is why I designed The Hip Thruster to be this height. Taller individuals might feel more comfortable with a taller bench and shorter lifters with a shorter bench. In general, a range of 13″-19″ will satisfy 99% of lifters. I recommend that you experiment to figure out a height that allows for an easy set-up and a height that allows you feel the most activation in the glutes.
For the regular hip thrust, set up in a position with the bench lined up at around the bottom of the shoulder blades.
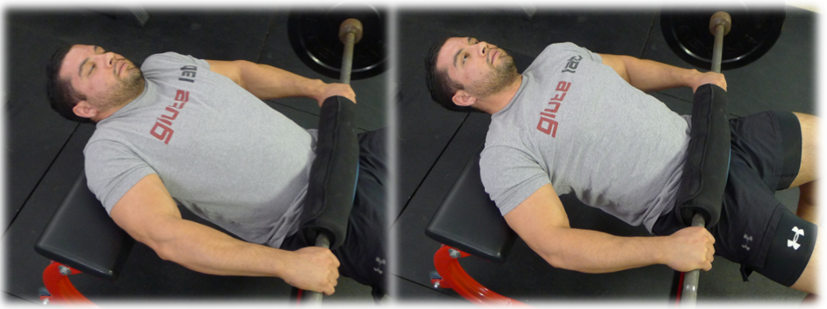
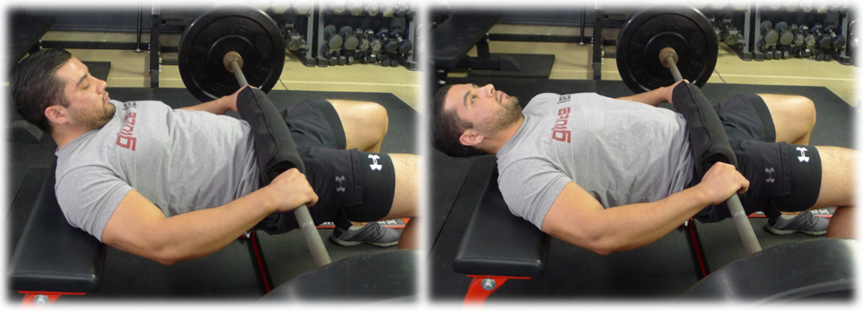
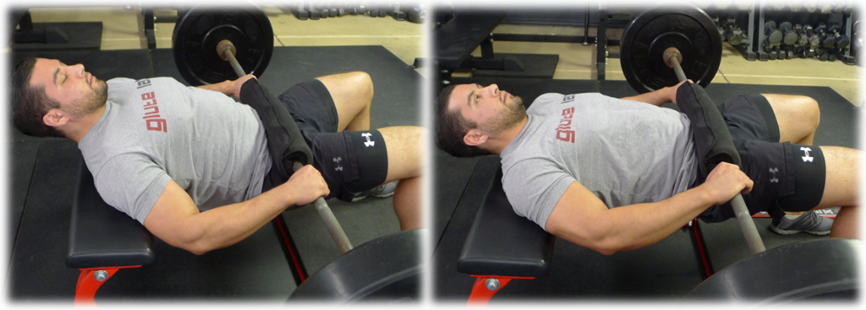
For the American style hip thrust, the pivot point is lower on the back. With the American style, many lifters will find that they can lift heavier weights. However, some lifters won’t be stronger with this variation and must use lighter weights. With the American version, you are going to set up with the mid back on the bench. With this variation, many find that less pressure is placed on the back, and most feel more loading on the glutes. The movement is performed with a posterior pelvic tilt which natural occurs when placing the back on this position. We’ve tested three lifters so far in gluteus maximus EMG and have found in all three individuals that glute activation is higher with the American version.
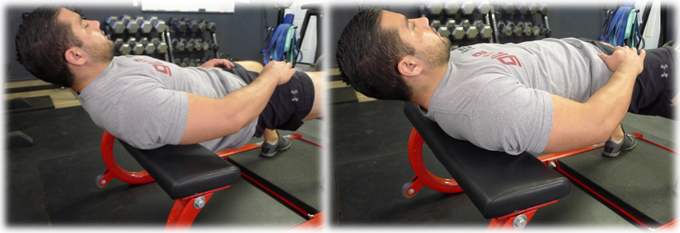
Left: American Hip Thrust Set-up, Right: Regular Hip Thrust Set-up
For both variations, make sure your back acts as a pivot point around the bench. Do not allow your back to slide back and forth during the movement!
Bar Position
To the get the bar in proper position, simply roll it right over the feet if using standard size Olympic plates. For those who are just starting out and cannot use 135 lbs, it makes it difficult to get into the starting position. This is where bumper plates become useful since they are the same diameter as standard Olympic size plates, which allows the lifter to roll the bar right over the thighs to get into position. The smaller plates make it impossible to roll the bar over the legs onto the hips. If this is the case and you do not have access to bumper plates, you have two options. First, you can have a partner lift the bar and gently place it over the hips for you. Second, you can deadlift the bar up and sit on the bench, then move down to the ground. Kellie Davis does a great job of demonstrating solutions in THIS blogpost.
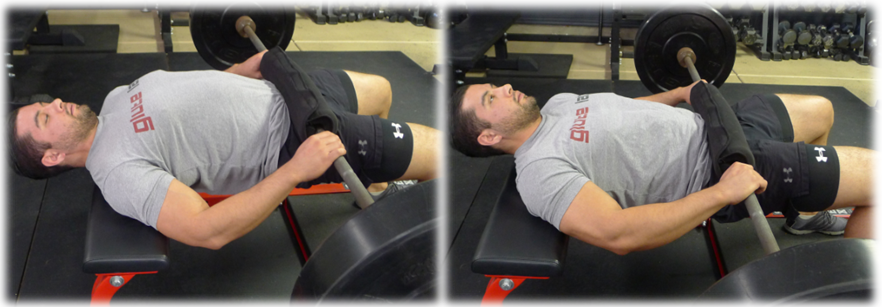
Left: Improper Shoulder Position Shrugging, Right: Shoulders Relaxed
The bar should be positioned in the crease of the hip with the hands holding the bar into position throughout the movement so the bar does not move forwards or backwards. Be sure to keep the shoulders down and prevent shrugging when holding the bar. Some feel more comfortable with a supinated grip (some claim this helps improve lat function which subsequently leads to better glute function), while others prefer a pronated grip. This is entirely up to you. Do not let the bar slide forward or backward during the hip thrust – keep it centered over the hips!
Band placement is going to be the same as bar placement on the hips. For those of you who are lucky enough to have access to a Hip Thruster, the band placement is simple. For those of you who aren’t so lucky, you have to become a little bit more creative. Below are two possible options to set-up the band hip thrust without using the Hip Thruster. Options include using the band peg placements in a power rack and looping a band around a bar and then stepping on the band (obviously this requires band plus bar tension, and since the bands aren’t centered at the hips, it’s not as effective). I have also seen a set up whereby heavy dumbbells anchor the band down, but this option limits the band tension to the sum of the dumbbells used, so if 120 lb dumbbells are used, then the band tension cannot exceed 240 lbs or else the dumbbells will rise off the ground.
Protecting Your Hips
Heavy hip thrusting is brutal on the hips. While some lifters can tolerate hip thrusting without any padding, most will find the lift excruciatingly painful if padding isn’t used. Even worse is that pain will shut down muscle activation and prevent the glutes from receiving an optimal training stimulus.
There are a few different ways to protect your hips and make the hip thrust comfortable. Below I have listed the most popular ways to pad the bar. If you currently do not have access to any of these, I recommend investing in one of them, as it makes the movement much more comfortable. Many lifters are shocked when they finally decide to purchase padding and remark as to how much better their glutes fire when they hip thrust pain-free. Other options such as rolling up a exercise or yoga mat or using a thick towel wrapped around the bar can indeed work, but they are not as effective. You can find these items on Amazon or through a Google search:
- Hampton thick bar pad
- Airex Pad
- Squat Sponge (this is currently our favorite option – it should be called the hip thrust sponge!)
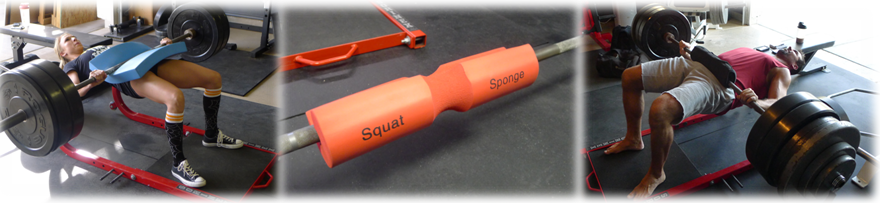
Left: Airex Pad, Center: Squat Sponge, Right: Hampton Thick Bar Pad
Feet
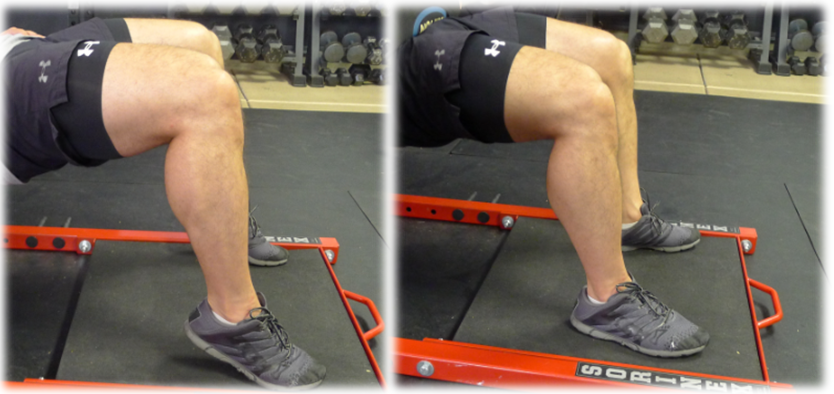
Once the bar is set over the crease of the hips you will need to get your feet set in the proper position. Bring your feet up towards your butt and “screw” the feet into position. This may be difficult depending on the thickness of the pad you are using and depending on your body size, but you want to “get tight” by wedging the body into proper position. Set your feet so that at the top of hip thrust, when the hips are fully extended, your shins are vertical. Sometimes the shins won’t be vertical and will have a slight angle, but in general you want to limit this. Toes can be pointing straight ahead or turned out slightly. Tinker around to find the foot position that allows you to feel the most glute activation.

Left: Correct Vertical Shins, Right: Incorrect Negative Shin Angle
Execution
While performing the hip thrust, it is important to make sure you do not jerk the weight off the floor but use a fluid motion instead. I can’t stress this enough – you want a smooth hip thrust, not a spastic hip thrust. Once you follow the steps above and are in the correct starting position, take a deep breath, brace the core, and drive through the heels, keeping the knees in line with the toes
- Focus on moving the weight with the glutes and not the lower back or hamstrings
- When you approach the top of the movement, finish the lift by contracting your glutes hard and pushing your hips forward. Do not overextend the lower back
- Finish the movement with your hips as high as possible while maintaining a neutral spine. At the top of the movement your torso should be parallel to the ground with hips pushed through
- Lower the weight under control keeping tension on the glutes
- Repeat for desired number of reps
Repetitions can be performed by touching the floor on each rep or by reversing in mid-air. There are benefits to both options. By touching the floor on each rep, you can “reset” each rep and you ensure that you’re using full hip ROM. However, by reversing in mid air, you keep constant tension on the glutes which can lead to greater burn and a better glute pump. Some lifters, especially shorter lifters or those with shorter torsos relative to their leg length, will find that the mid-air reversal is much more comfortable for their bodies. There’s nothing wrong with reversing in mid-air. Many women prefer this option, whereas many men prefer to touch the ground on each rep. Tinker around to find what works best for you.
Common Hip Thrust Mistakes
Excessive arching of the low back
This usually occurs because the weight is too heavy. The glutes aren’t strong enough to lock the weight out so the lifter substitutes by arching the back. A more detailed article on this topic can be found by clicking HERE.
Left:Poor Overextended Spine, Right: Good Neutral Spine – Notice Flat Torso
Quick Fix: Reduce the load and brace the core throughout the whole range of motion. Focus on only moving at the hips and on not allowing movement to occur at the lumbar spine.
Improper neck positioning
Going into cervical flexion can be problematic for some lifters, causing cramping and neck discomfort.
Left:Poor Flexed Neck, Right: Good Neutral Neck
Quick Fix: Be sure to maintain a neutral neck position throughout the movement
Insufficient hip extension
Failing to reach full hip extension is also usually due to the load being too heavy. This can also happen on account of extremely tight hip flexors.
Left: Poor – Failure to reach full hip extension, Right: Good full hip extension
Quick Fix: Drop the weight, allowing you to completely lock out and finish the movement. Also some static or dynamic stretching of the hip flexors (especially the rectus femoris) before or in between sets can help.
Rising up onto toes
This typically occurs with people who don’t know how to perform the movement properly and with those who are very quad dominant
Left:Poor – Rising onto toes, Right: Good – Feet flat driving through heels
Quick Fix: Keep your toes on the floor and focus on pushing through the heels throughout the set (you can also dorsiflex and lift the toes if this helps)
For a more in longer in depth look at the hip thrust check out this video:
To see the evolution of the hip thrust, including all the different exercise variations possible, click on THIS link. To read up on the science behind the hip thrust, click HERE.
At this point, you should have a sound understanding of how to perform the hip thrust and of what is considered proper form and technique. There should be no more excuses for a lack of glute development. Pick your glute building poison and get to work.

By the time I post this comment, I’ll probably go back up and laugh all over again. You go Bret!
BWhbawhbahaahaa! Best awkward gym video EVER!
Love everything you do, Bret. (Nice article on PTDC today as well)
If ever I need a quick laugh, now I know where to come, has got me every time I watch…maybe I will get over it and read the article 🙂
Hey Bret,
Love your stuff, but can I ask what the reasoning is for avoiding negative shin angle like pictured? Is it actually bad? Because it seems like if I wanted to hit the hamstrings a little harder as well, it’d be good to have the feet out a little further so that the knee isn’t as flexed, letting more of the hamstrings contribute. Or am I mistaken?
Patrick, I had a negative shin angle here: http://instagram.com/p/gWpLyapdDs/
Sometimes I’m vertical and other times I’m angled. So there’s wiggle room, but you don’t want to stray too far in terms of having your feet too far out in front or too far behind the knees. I agree that further out would activate more hammies as you mentioned, so if that’s the goal, then that’s fine.
That first GIF just made my day. Everyone in my back yard will now be making direct eye contact when they perform this lift.
That GIF is hilarious! (And can’t be unseen. Damn you, Contreras! :))
Do you realize that it has been almost five years since you unveiled the barbell HT? My how time flies!
A few thoughts, ideas, variations:
1. PPT! I really think that a posterior pelvic tilt lockout is the key to a safe, optimally performed hip thrust, especially when you start piling on the plates. Does it shorten the ROM a bit? Yes.
Is this a problem? NO.
Trying to crank ROM up top to mirror Bret’s freaky hip hyperextension abilities may force you into lumbar hyperextension if you are not that mobile. BC is able to get the bar above the midline without excessive lumbar extension.
Meanwhile, if I get to neutral without cranking the lower back, I feel pretty good about it.
2. Use the abs up top as a brake.
Goes hand in hand with the above. Lumbar hyperextension on a HT is the evil twin sister of lumbar flexion on a DL.
The ab complex is not really necessary on a HT since the body is supine. So you have to make it necessary! Perform a lower ab “crunch” at the top.
3. Choose your synergist.
Quads: First, tuck the heels all the way to the butt. Then, if you can somehow angle the feet on an incline slant, heels down, this will now provide a massive quad extension effect, as the force will necessarily be transferred through the toes, hence the quads.
It is now effectively a lying “sissy squat” combined with a HT. As in, a first rate quad exercise combined with a first rate glute exercise.
Hamstrings: Raise the heels above the ground, a bit further from the body. “Leg curl” the start, squeeze glutes to finish.
Good stuff as usual Derrick!!! I always appreciate your input.
Derrick,
Do you have any videos of your choose your synergist ideas?
Hey Micheal, I am heading out on a little vacation this week, but I do train when I am “vacating”.
Most of this stuff I work up in my home gym, but this week I will be training “in the wild”. I should be able to MacGyver something up and link it here. Maybe this weekend?
Just as a frame of reference, the slantboard quad synergist concept came from putting two decline ab benches together to fashion a ghetto “Skorcher”, modeled on Bret’s original bad ass HT apparatus. The angled foot placement pumps the quads like crazy!
Glad you’re interested! DB
Look forward to see some Rambo-esque vids!
http://www.youtube.com/watch?v=3vdtMdRSe_k
Hi Michael, here is a quick little vid demonstrating the extreme opposite ends of the spectrum, quad to hamstring.
Bear in mind, this was a hasty and haphazard setup following a back training session; I would definitely advise setting up a more secure anchor points, esp. as you start loading up! (And you can load up quite heavy and put the quad, in particular under very challenging load.)
So anyways, this is a no load demo to illustrate how to shift the synergistic focus at the knee and hip joint, working off the basic HT model.
All the best! DB
http://www.youtube.com/watch?v=G03ujUVMbdM
Hey Michael, if you are still out there, here is a better setup, and video demonstration of a “quad thrust”. Angled foot placement, and also a more graduated torso angle.
Sorry if I’m mining the same turf unnecessarily, I do tend to get a little obsessive!
Too bad a lot of people will look strangely at you while performing the exercise, but it’s perfect for those glutes 😛
Haha, I love the creep GIF!! Brilliant. I absolutely love hip thrusters, but it’s kind of funny because I’m the only person in my gym that I’ve ever seen doing them. I do get some strange looks sometimes — but no direct eye contact! I probably need to invest in some form of padding, the only bar pad that my gym had has disappeared. I’ve been using a rolled up yoga mat, but as you said, I think I’ve just about hit the weight limit where it’s even a little bit effective.
I love the creepy, freaky gif. I agree with Derrick, it can’t be unseen!!! That is just funny as all get-out. I was able to get past it and read the article, which makes me feel accomplished. Keep being the fantastic goofball that you are. Good work.
This is really going to improve my technique.
Before I would just glance up but now I know you have to leer and follow them around the room with your eyes. Clutch!
Coach Bret, that gif is HILARIOUS. LOL.
I personally don’t see what’s wrong with making eye contact with someone whilst doing thrusters but it’s gotta be the right person at the right time.
These are a fantastic exercise for back and glutes. The article states that they also develop the hams but I find for me not so much.
When I first started doing them I did too much back arching–so definitely if someone is starting this exercise, they should go slow and easy and first. Good article.
I don’t know if it’s the increased frequency of training or the hip thrusts but I actually gained leg mass, not just glute muscle, since using your template from SC. As a skinny chick, thats what I was going for so I’m very happy with the results!
Thanks for all that you do!
bret- you are my idol. i absolutely love the hip thrust and what it has done for my glutes and subsequent improved performance in sprinting and deads. your articles are so informative and helpful- especially the breakdown of seemingly ‘simple’ movements. thank you so much!!
Bret, please do a similar blog post on the GLUTE BRIDGE.
It would be great if the GIF was a 360 degree Exorcist style rotation. 180 degrees of creepy is still plenty funny though.
The GIF is HILARIOUS!!! Haha oh my…
Been hip thrusting for about 2 months now and have probably added about an inch onto my butt. I have trouble getting my pants on sometimes haha. In addition, my squat and deadlift feels so much more powerful. I actually caught myself standing to the side in front of the mirror in my underwear checking out my ass size. This is definitely one of my favorite exercises now. Thanks a lot Bret!
Thank you so much for this detailed tutorial,Bret!! I’m two weeks into the beginner program from Strong Curves and my back feels great, my anterior pelvic t ilt is improving and I’m starting to see some visual changes too. All good stuff. Best wishes and thanks again!
LOL
I love the GIF withe the “creep” nice one!
One place I have found handy for using bands is the Smith Machine. Now, don’t anyone go all hater on me. : ) On our gym’s smith machine, there is a 1/2 to 3/4 inch gap between the floor and the frame. I thread a door anchor, like those used for elastic resistance bands, between the frame and the floor on both sides. On each of those, I clip a carabiner. The bands are clipped into the carabiners and from there I think most people can figure out what to do: place your bench, slide under the bands, and thrust away. I hope this helps those of us who can’t convince our gyms to purchase a Hip Thruster or afford one ourselves.
Very interesting Roy! Thanks for the tip – no hate from this guy 😉
This was really helpful, Bret. Particularly the video. Thank you!
hahaha!!! Creeper!
Hello Bret –
Does the hip thruster help you to tighten, shrink big thighs and butt? I have Ankylosing Spondylitis for 15 yrs now and seen my hips, thighs and butt get bigger as the years go by. I have a very low self esteem because of the weight I have in those areas. Is there any tips or information you can provide to me on how to shrink these areas by half the size.
Thanks,
CG
For a cheap and effective barbell pad, I use a pool noodle that I cut in half, then slit down the middle so I can squish it over the barbell. It works very well! It is much more dense than the regular thick bar pad I use for squats.
The only issue I have with the hip thruster is every other time I get some sort of comment about how heavy the weight may be or how about how the exercise is for home use only. Or I’ve had several guys offer to help me lift it up off the ground for my first thrust. I now feel a little self conscious when I do them. I go in the corner now and face the wall when I do them.
Bret,
What time of bands do you recommend for hip thrusts?
Thx,
Jeff
love the gif dude, hilarious!!
This gives me hope as i’m a 52 yr old female and have lost 100 lbs and my knees are SHOT, i cannot do any squats or lunges at all and can only work my upper body. I have Chronic Fatigue Syndrome and Fibromyalgia which complicates matters further (the fatigue in doing exercises, especially) so i think i am going to try to do Hip Thrusts to at least have some development in my lower body 🙂
That GIF is hysterical Bret. I just tried to explain this to my Thai wife, even funnier. Awesome article, love the hip thrust.
Can you do the hip thrusts without a bench? Can you just lie flat on the floor with a barbell over your pelvis? That’s how I did it tonight because I saw some people doing it that way.
Thank you so much for the Creeper gif. I was in desperate need of a good, stress reliving belly laugh. You made my day, good sir.
Bret when bringing a heavy platted down for the hip thrust. What is the best way to get under it?
This is my issue, because the stronger I get the more difficult it is for me.
Ignore previous found it in your article. Sorry!
Bret, have you ever heard of this before? I started doing hip-thrusts and it gave me bruises at my hip flexor area, even though is used a pad on the bar.
It wasn’t painful at first, so i ignored the bruises and kept on hip-thrusting, but after 3 weeks the bruises had gotten worse and i started getting a pain and a warm feeling in that area, which got worse and worse and to the point where i had to stop doing all exercises that involved the hip/hip flexors.
so now i’ve been resting my hip area for 2 weeks and it’s not near fully healed, the bruises have started to subside, but still visisble, and the pain is still there, but not as bad as before, so i’m quessing that it will take atleast another 2-3 weeks before i can start doing some light compound leg exercise again (only doing leg extensions and knee flexions now to maintain as much LBM as possible now).
Also, i didn’t/don’t have any pain when resting, i feel it the most if i lie on my back and put my legs in a leg press position (parallel squat /legs in the air).
I also feel it when the hip area gets stretched, like in a lunge or RFESS (resting leg) and a little bit if i squat below parallel.
Have i gotten some inflammation or?