Today’s article comes from Los Angeles based personal trainer Ben Bruno. Many of you will recall Ben’s plentiful hip thrust variation contributions to the Evolution of the Hip Thrust article, but Ben has contributed numerous unique, effective methods to the strength training industry. I consider Ben to be one of the top five best trainers in the world for developing glutes with both men and women. At the end of this article you will find links to Ben’s blog and social media.
12 Tips for Better Hip Thrusts
By Ben Bruno
I really like hip thrusts and single leg hip thrusts and use them with most of my clients regardless of whether their goals are more physique or performance oriented because I think they have value in both cases. One thing I like about them is that there’s a relatively fast learning curve so clients tend to pick them up quickly, but they can still be a little awkward at first. After using hip thrusts with all sorts of different clients of all ages, abilities, and body types, I’ve found some ways to improve the thrusting experience that I hope you’ll find helpful.
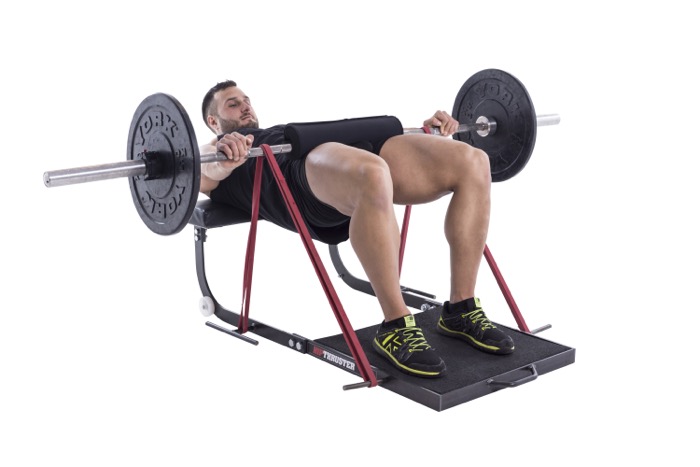
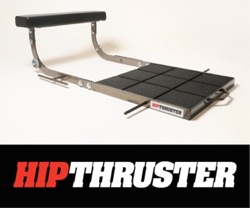
The Hip Thruster is the best way to do the hip thrust – stable and versatile!
1. Pause for a Second
I like to tell my clients to pause each rep for a second at the top to help ensure that they’re coming all the way up and achieving full extension and also to ensure that they’re using their glutes to do the work instead of the lower back. This brief pause also helps ensure that you select a weight you can control and eliminates ego lifting because if the weight is too heavy you won’t be able to pause at the top.
The one exception to this rule for very advanced lifters and experienced hip thrusters where I’m not as anal about the pause at the top if it’s clear they’re coming all the way up and using good form, but as with many exercises, you must first prove that you know the rules before you can break the rules.
2. Find Your Center
One of the biggest problems people have when they first start using the barbell for weighted hip thrusts is getting into a good starting position with the bar centered on the hips. And if the bar isn’t centered from the start, it’s going to tilt and make it impossible to get in a good groove for your set. It can be tough to know if the bar is centered though, especially if you’re using a pad between your body and the bar (as you should be) because the pad keeps you from seeing your hips.
A simple way to help make sure the bar is centered is to put a small piece of tape right on the center of the bar so you can make sure it’s centered. I just use scotch tape so you can’t even notice, but it really helps.
3. Find Your Ideal Foot Position
As a general rule of thumb, I like to tell people to position their feet in such a way that when they’re at the top of the hip thrust, their shins are perpendicular to the floor. If your feet are in too close to the butt it tends to put more stress on the quads (and I’ve also had numerous clients say it bugs their knees), but if you’re feet are too far away it tends to take stress off the glutes and puts it more on the hamstrings.
That being said, when you train a lot of people you learn that there are really no hard-fast rules and for every person that falls within “normal” guidelines, there will be two exceptions because everyone is different. As such, take some time to play around with different foot positions and see where you feel it best.
The same applies for stance width, as some people do better with a narrow stance while some prefer a wider stance.
Once you find your ideal foot position though, it can help tremendously to put plates where you want your toes positioned so that you can find the same foot position for each set.
4. Pick Up Your Toes
You’ll often see people pushing through their toes, even with repeated cueing to push through the heels. Rather than continue to cue them like a broken record to no avail, I like to have them physically lift their toes off the floor, or at least tell them to lift their toes inside their shoes.
Another way to achieve the same thing without having to lift up the toes (which can feel a little awkward at first) is to put your feet on the small mat with your toes dangling over the edge, as UFC fighter Brendan Schaub demonstrates here:
5. Use Collars!
This sounds too obvious to be worth mentioning, but I’ve seen enough near-accidents happen to where it warrants noting. A lot of people do their hip thrusts after they deadlift since they bar is already loaded on the floor, which makes sense and is something I often do as well. Trouble is, if you aren’t using collars on your deadlifts and go to hip thrusts, the plates will slide around, especially when you’re first trying to lift the weight up off the floor as it rarely goes up evenly. I won’t belabor this point, but pay heed!
6. Don’t Sleep On the Short Bar
I’ve found that a lot of women, especially women with slighter builds, tend to do better with a shorter barbell. If you or your client has trouble stabilizing the full-size bar on your hips and finds it wobbling and tilting, try using the curl bar or E-Z bar. The preset mini bars that they have in a lot of commercial gyms work really well, too. The shorter bars also make it easier to get the bar into position if your gym doesn’t have big diameter bumper plates and you aren’t thrusting a weight that allows you to load the bar with full-sized 45 pound plates.
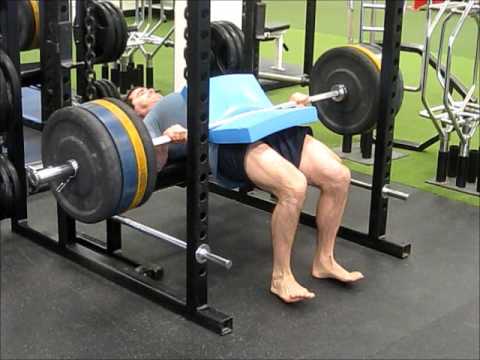
7. Trouble Getting It Up? Try This
Most people report that the hardest part about hip thrusting is getting it up.
Cue the jokes…
If you have trouble sliding the bar over your legs to get into position, try doing rack hip thrusts like this if your rack allows you to set up in this fashion.
Another option is to use a curved buffalo bar if you’re lucky enough to have one in your gym. These bars are rare and are usually something you’ll only find in powerlifting gyms, but for bigger dudes that have one available, it works great for hip thrusts by giving you more room to slide under the bar, and the curve in the bar helps keep the weight steady on your hips to avoid tipping.
8. Progressive Overload Matters, But…
I think that fastest way to see physical changes in your butt is to focus on progressive overload on the hip thrust. Don’t just do the same weight every workout and go through the motions. Record your numbers and try to beat them every workout. I set the bar very high for my clients when it comes to hip thrusting performance and most of them look at me like I’m crazy when I first tell them the goals I have for them, but with a concerted effort to improve it’s amazing how quickly your numbers, and in turn your glutes, will improve.
That being said, a lot of people reach a point in their progression where the weight on the bar starts to bother their hips—even with good padding—and it becomes very difficult to get the bar into position for the first rep. Some of my bigger guys can seemingly thrust as much weight as they want without issue, but a lot of my clients with slighter builds—both men and women— reach a point where continuing to add weight to the bar is not a viable solution, and I can totally relate because I find the same thing. I’d like to be a tough guy and tell you it doesn’t hurt with a ton of weight on me, but, it does.
As such, it can be useful to use different methods to allow you to get a training effect with lighter loads. Two of my favorites are:
“1.5” reps: Come all the way up and pause, then come halfway back down, then come back up again and pause. That’s one rep.
Countdowns: Start by performing five reps followed immediately by a 5-second iso hold at the top. Then go immediately into four reps followed by a 4-second hold: then three, then two, then finally one. After the last rep, hold the top position for as long as possible, shooting for 10-30 seconds. This makes for a great finisher that will leave you with an unrivaled glute pump.
With both of these methods you should still focus on progression, but the weight will be substantially less than if you were using regular reps so it won’t be as uncomfortable on the hips.
9. Don’t Neglect Single Leg Hip Thrusts
I see a lot of folks focus on weighted bilateral hip thrusts but I don’t see nearly as many people focusing on progressing single leg hip thrusts. To me, that’s a mistake.
I actually prefer the single leg hip thrust to the bilateral hip thrust for myself and a lot of my clients, and I think it has tremendous value.
Interestingly, I often talk about the value of single leg knee dominant training (Bulgarian split squats, lunges, skater squats, single leg squats, etc.) as a way to overload the legs more than you can in bilateral squatting variations through the bilateral deficit. With hip thrusts though, the bilateral deficit doesn’t seem to apply, and I think most people won’t single leg hip thrust even close to half the weight they can use for bilateral hip thrusts. Even with lighter loads, I still think it’s a great exercise and I actually feel it more in my glutes. I also think it’s a great option for people who tend to feel heavy bilateral hip thrusts in their lower back, as flexing the hip on the non-working leg seems to limit the ability to overarch the lower back.
And for my fellow lazy-asses out there who abhor loading and unloading plates, it takes a lot less setup due to the lighter loads. Just sayin…
10. Single Leg Hip Thrust Progression
Once you’ve mastered bodyweight single leg hip thrusts, it’s time to add load.
My first progression is to place a dumbbell on the thigh of the working leg, like this.
From there you can progress to a barbell, which can be a tricky transition at first because it can be tough to keep the bar steady on the hips.
For that reason, I like to start people off doing a version where they come up on two legs and lower down on one leg, like so.
Once you feel good with those, you can go to full single leg reps.
And again, the shorter bar can be very useful here.
11. Start Single Leg Hip Thrusts From the Top
With single leg hip thrusts I’ve noticed that people struggle a lot with steadying the bar on the first rep and getting centered. The best way I’ve found to help with this is to have people thrust up on two legs and then pick one foot up and start the set from the top as opposed to trying to break the bar off the floor with one leg. It’s a small tweak that makes a huge difference.
12. Try This Combo
Why choose between bilateral and single leg hip thrusts when you can do both?
One of my favorite hip thrust variations is to start with single leg hip thrusts, doing a predetermined number of reps per leg, and then going straight into bilateral hip thrusts for the same amount of reps.
A lot of my clients will do this with just bodyweight and it works as an awesome finisher, and you can also do it with weight if you’re the masochistic type (like me) who enjoys doing the awkward duck walk out of the gym.
Author Bio
Ben Bruno is a personal trainer in Los Angeles, California. He also publishes a blog and free newsletter at www.BenBruno.com. You can connect with him on social media through:
Instagram
Absolutely fantastic information from you Ben. And thanks for making it available on your site Bret.
Awesome stuff 🙂
Great article! I use a lot of single leg hip thrusts, but on the floor as opposed to using a bench. Are there any additional benefits to thrusting from a bench? Or any limitations to using thrusting from the floor?
Thanks
Do you have any advice on bench height? I’m about 5’5″ and have been using a step with 3 risers.
This is so great! I’m going to start loading my single leg hip thrusts tomorrow! Thanks so much for the tips. 🙂
A great article Bret. Most personal trainers and people in general in the gym, do not include those exercise routines into their weekly training.
LOVE IT! Thank you so much for the great variations !! Can’t wait to try some of these.
Thank you so much for this! Just a quick question.
What is your opinion on doing the hip thrust exercise on an assisted smith machine?
Nice post. Very informative. You are the most popular guy in terms of glute activation exercises.
I’ve read this piece multiple times and it always helps.
I am noticing, like in the first listed tip, that my lower back is taking most of the work. I’ve been having trouble getting my footing right- but when I get them in a good spot, I’m still feeling the lower back take on more of the load. Any suggestions?
Countdowns, I’ll get my next workout revved up with these.